

Today the dental practitioner is faced with a variety of implant strategies. They involve the location, number, inclination, and distribution of forces required to support functional and parafunctional demands of occlusal loading. Occlusal restoration of the natural dentition has classically been divided into considerations for sufficient posterior support, occlusal vertical dimension, and anterior guidance to provide comfort and aesthetics.
Once the sources of additional force on the implant system have been identified, the treatment plan is altered to reduce the negative sequelae on the bone and implant and safeguard final restoration. One risk factor for peri-implantitis may be due to occlusal overloading. This practice and parafunctional habits may negatively influence implant longevity, but it must be emphasized that it is viable to approach planning from a “number of implants” standpoint and to increase the implant-borne surface area.
Misch1 stated that “the additional placement of implants should be positioned with the intent to eliminate cantilevers when possible,” and that nighttime appliances designed with specific anterior and canine rise features will benefit the occlusal loading on the dentition.
Case study
 A white, 62-year-old female presented with no chewing ability due to lack of posterior teeth. She was tired of the pain of partial dentures, and the area around teeth 22 and 21 bothered her. More importantly, she felt 10 years older than her actual age due to her sunken cheeks and collapsed mid-face. She smiled with very little confidence. To me, this was her most important concern when we planned treatment.
Clinical evaluation revealed no health history contraindications to dental treatment, temporomandibular (TM) joint within normal limits, and muscle palpation tenderness bilaterally in the masseters and temporalis. Aesthetically, very little tooth exposure was seen when the patient smiled. Gingival asymmetry was noted, along with unpleasing PFM crowns.
The remaining dentition 3-10 and 21-26 revealed periodontal structures within normal limits with the exception of teeth 21 and 22. Severe undermining decay on these teeth, with an associated fistula draining between them, deemed the teeth non-restorable.
Comprehensive exam
The most important task was to determine the degree of vertical collapse, if any. During this type of evaluation, the patient’s physiologic rest position is based upon oral physiology. This permits an automatic localizing of the mandibular rest position between acts of swallowing and the patient’s ability to maintain this position at any given time. This was accomplished on my patient using a TENS unit to stimulate bilaterally involuntary contractions of the temporalis, masseter, and diagastric muscles to exhaustion.
Wylie2 found that in most patients, the degree of vertical development in the buccal segments was determined primarily by the jaw relationship as dictated by the musculature, but that in some cases the full degree of vertical development permitted by the musculature was not attained. These particular cases offered the best outcome prognosis for orthodontic or reconstructive care.
Tomography of the edentulous areas and TM joint (CO, rest) determined the number and diameter of implants with establishment of joint position. A 3-D jaw tracking and joint vibration analysis by BioResearch Data equipment provided further information on the patient’s trajectory of closure and muscle harmony.
A measurable point of muscle activity silence and TM joints positioned comfortably in a braced position is the preferred outcome. From this position a bite record and a postural horizontal stick bite reference can be attained. Full mouth models were mounted on an Artex semi-adjustable articulator. A laboratory-constructed full contour wax-up of teeth to be restored on both arches was created. Determinants of the pattern of occlusal contours and anatomy were dictated.
In my clinical experience I have observed two types of functional chewers: “cows” and “rats.” Facial types are important to relate the occlusal schemes for the envelope of function. My female patient was a brachiocephalic head type, which meant strong loads and side-to-side chewing envelopes. The prescription for the wax-up of the maxillary posterior teeth was to have the buccal cusps out of occlusion and the mandibular posterior teeth in a zero-degree occlusal anatomy to eliminate destructive lateral interferences.
The anterior segment was set up with a long centric for the patient, which means a separation from CR-CO. This concept eliminates the “locked in” feel of the anterior segment upon closure. When long centric parameters are not adequate, occlusal disturbances occur from this wedge effect during initial closure of the lower jaw. This results in breakage of restorations and muscular disharmony. Different degrees of abrasion or hyper-mobility of the anterior teeth can potentially trigger bruxism and headaches.
My next communication to the laboratory for the full mouth wax-up was the aesthetic appearance of the anterior segment. The selection of the width and length of the central incisor should be in a range of 75-80 percent (W/L X 100). Based on the patient’s brachiocephalic facial appearance, I chose a ratio of 80 percent. The laboratory then created the golden proportion as well as the pitch, roll and yaw of the maxillary arch. I like to create the maxillary arch base mean foundational occlusal plane first. I then relate the mandibular arch. The analogy I use with my patients is “creating the garage first so that the car will fit” .
Treatment sequencing
All old dentistry was removed during the initial appointment. A stent reduction guide doubled as the surgical guide in the redesign of the preps. Gingival recontouring of both arches with a Deka UltraSpeed CO2 Laser and fabricating provisional restorations based on the new occlusal scheme and vertical dimension were completed.
Next, a laboratory bite jig was relined with registration PVS after teeth 4-8 were prepped to the desired contour. Teeth 3, 9, and 10 were prepped, then the bite jib was again relined with registration PVS. Teeth 23 and 26 were prepped and the jig was relined. (I added to the prepped areas, being careful not to overlay onto previous relined areas.) Teeth 24 and 25 received final prepping to hold occlusal stop contacts.
Placement of dental implants was based on the availability of bone occlusal load factors. The pre-surgical diagnosis of bone quality is important for implant long-term prognosis. Selection of length and diameter can also influence bone strain, especially in low-density bone.3 Literature has quantified that cancellous bone of higher rather than lower density may ensure a better biomechanical environment for implants. Moreover, longer or broader screw-type implants could be a better choice in cancellous bone of low density.4
Soft tissue entry was completed with the Deka laser for visibility and hemostasis. The maxillary left posterior segment (teeth 11-14) had four implants placed due to type III bone quality, in which case it was best to replace each missing tooth with an implant. The mandibular arch had bilateral edentulous segments with generally type II quality bone.
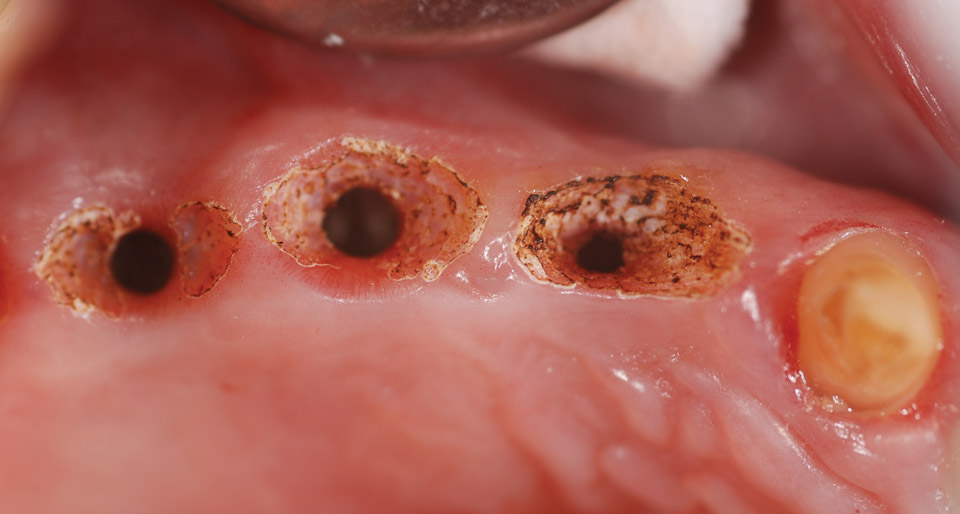
Typically, type II and type III bone are prevalent. The implants on both sides were designed to be splinted according to length and width criteria. The exception was on the left quadrant design, where tooth 22 would remain a single implant crown and teeth 21-19 would support a three-unit implant. The axial inclination of the implants was alternated slightly (not parallel) for better lateral and occlusal load distribution.
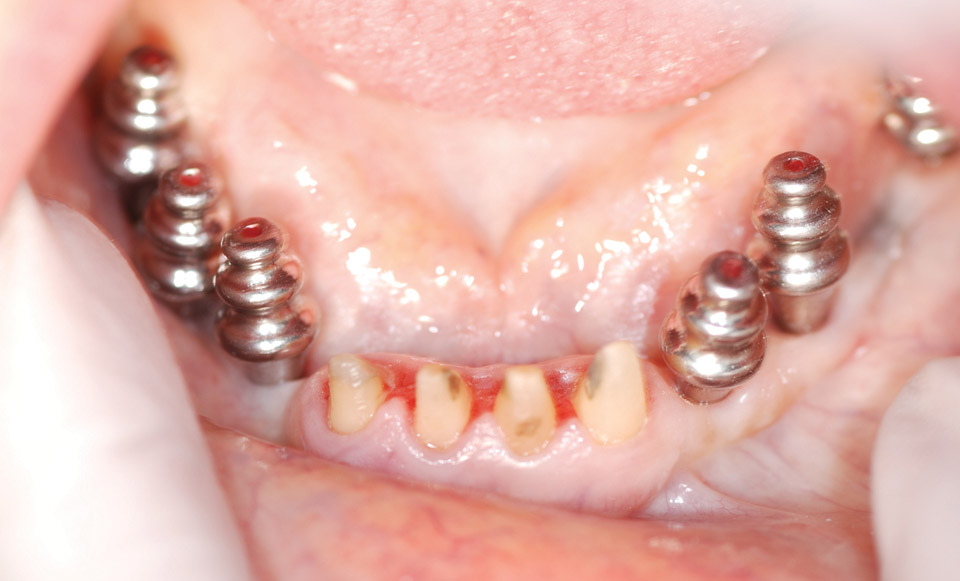
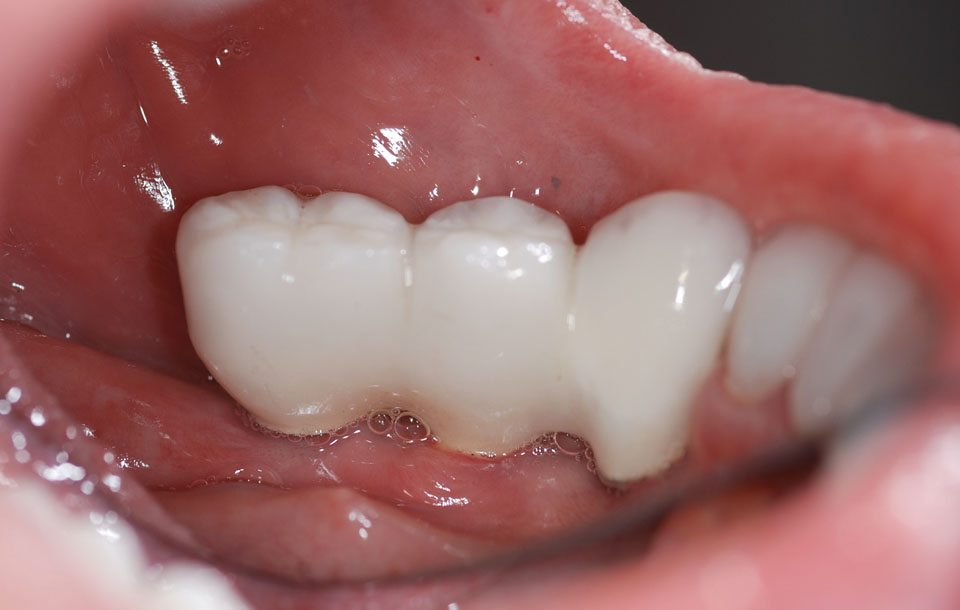
Gingival contouring between the maxillary implants to create interproximal papillae was facilitated with the Deka laser. Note the pale pink interproximal island, with no yellowing of the tissue. This laser is extremely friendly with implants and can be used directly on the surface for decontamination in peri-implantitis cases.
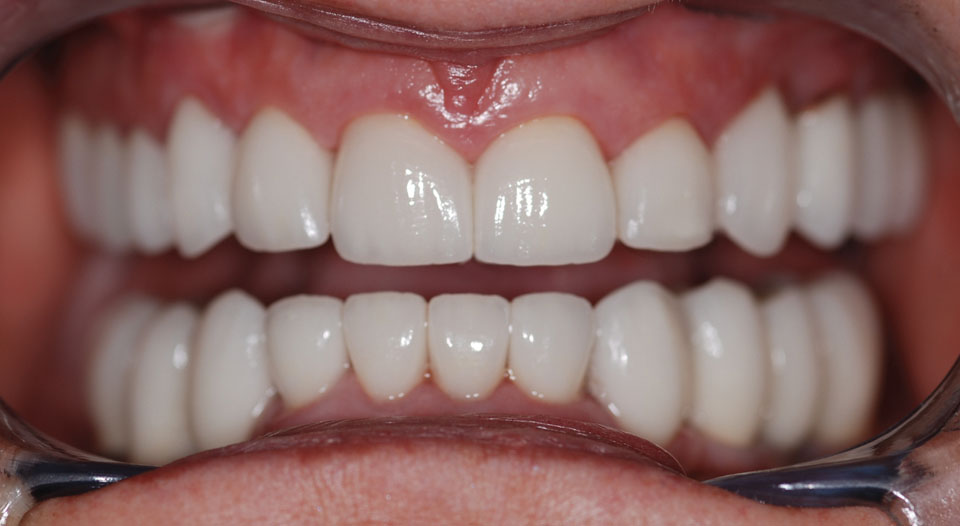
 The patient returned after three months for final impressions and bite records. Phonetics, lip support and final shade selection were reviewed. Photographs were taken to send to the laboratory. At this point, standard abutments were placed and new provisionals were fabricated, giving the patient her first sense of a full dentition (first molar occlusion). New tomography confirmed TM joint position.
Restorative materials
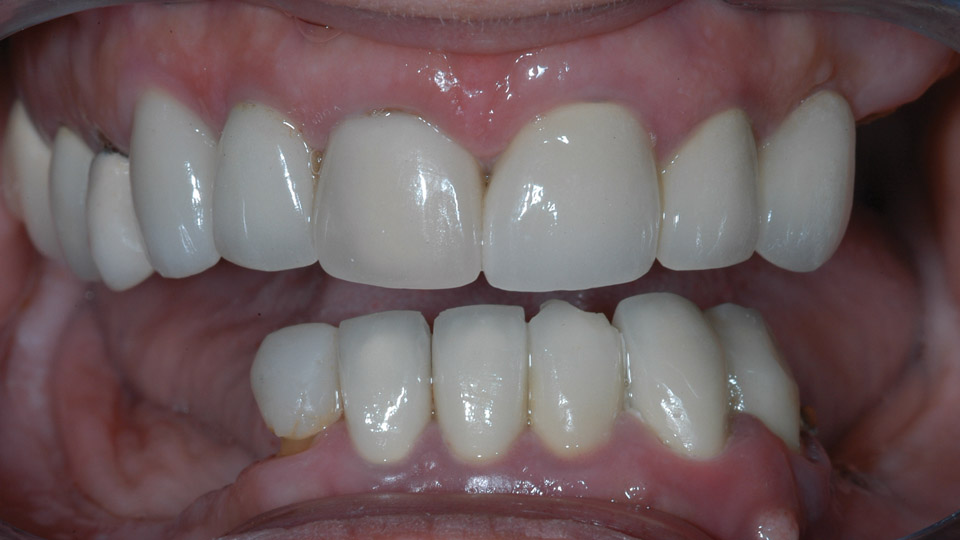
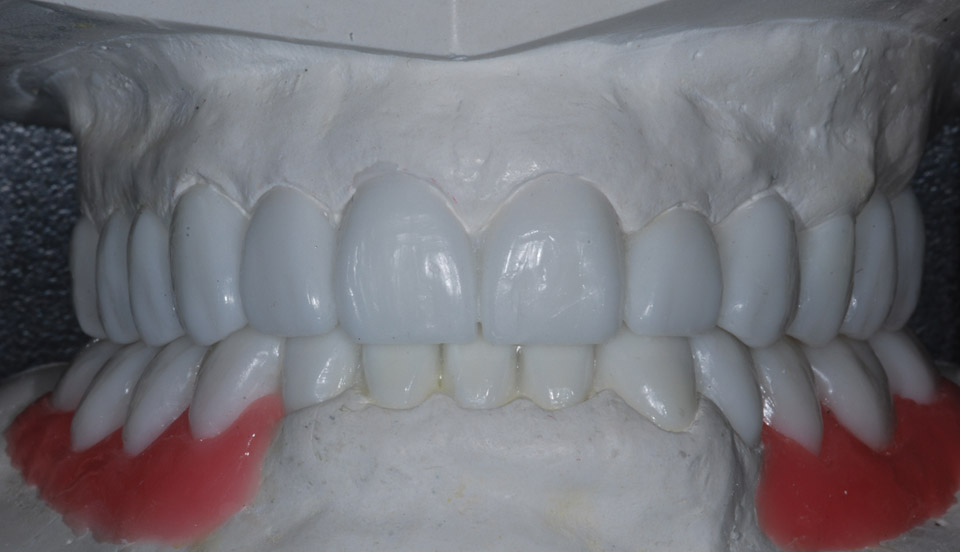
Empress Esthetic restorations were selected for teeth 5-11 and 23-26 for natural color and translucency. Shade selection with the chroma scope from Ivoclar began gingivally with the 110 tab, mid tooth 040 tab, and incisal third 030 with a milky-white, translucent incisal edge. A medium surface texture on the facial surface and light cervical warming created a desirable result.
The maxillary teeth 3, 4, 12, 13, and 14 were single PFM crowns. Tooth 11 had a zirconium custom abutment. The mandibular arch required splinting due to crown-to-implant ratios. Teeth 27-30 and 21-19 were splinted. Tooth 22 was a custom abutment with a PFM crown. Anterior Empress restorations were luted with Ivoclar’s Variolink veneer cement. Posterior restorations were placed with Multilink luting cement.
Insertion and occlusal loading
Placement of all abutments and try-in of implant restorations were verified with periapical radiographs for fit accuracy. After placement, an initial occlusal analysis was done with the aid of Tekscan’s digital occlusal detection system (T-Scan). Traditional methods of occlusal load detection include the use of articulating paper of varying thickness, waxes, and paste. Most of these methods are not sensitive enough to detect simultaneous contact, and none measure both biting time and force. Tekscan does it by recording the timing and force of a patient’s bite on a sensor that has over 2,200 pressure-sensing cells and captures it on video that can be broken down to one hundredth of a second.
The T-Scan system is a valuable aid to analyze a patient’s bite and reveal what is and is not functioning properly. When a bite is unstable it can cause pain, breakage and cracking of teeth and dental restorations, gum disease, tooth loss, headaches, TMJ Disorder and implant loss. The force video shows how sequential loading of implants after natural teeth can be achieved. This prevents unnecessary forces from causing implant failure, because natural teeth depress 26-10 microns into the periodontal ligament, whereas implants can only depress 5-25 microns.4 So, timing is everything in the initial adjustments of my full mouth cases.
 Only very minor adjustments are done on insertion day due to numbness and periodontal ligament weakness associated with splinted provisionals. A thorough occlusal analysis and adjustments will be performed 48 hours later. I start with CO-CR relationships and work on timing and equilibrate for equal force. I link this with the BioPAK EMGs to check muscle function and strength.
The patient will return in one month for a run-through on all extrusions, timing, and force measurements. Then the patient will be given a thermoplastic lower flat plane with a canine rise appliance for night use. This is adjusted for timing and force distribution on the T-Scan as well.
 The last appointment will be at three months. All adjustments are made with the Dialite porcelain polishing kit, starting with the blue cup with water. If adjusting with diamond burs, you will find out quickly that too much will be removed and you will be “chasing the bite.” I spend no more than 30 minutes on these appointments. I factor my time in on the total case presentation fee, which comes out to be $1,200. Every video can be saved and documented for the patient.
All practitioners have these partially edentulous cases. The psychosocial impact on patients whose quality of life has been impacted by their smile is priceless, and they are amazed to have teeth they can use with total confidence. Healing the patient first instead of restoring their teeth is best for everyone. However, the practitioner will need to rely on comprehensive outlook, confidence level, and most importantly the small details of treatment.
 Understanding diagnosis, sequencing, when to load implants, how many to use in what type of bone density, smile design proportions, soft tissue corrections, restorative materials, timing and force on natural versus implant teeth, and the patient’s overall state of mind will provide the expertise a practitioner needs to offer fulfilling, life-changing treatment for years to come. Remember, it’s all about constant and never-ending improvement!
Footnote references
1. Misch CE. The effect of bruxism on treatment planning for dental implants. Dent Today, Sep 2002; 21(9):76-81.
2. Wylie WL. Overbite and vertical facial dimensions in terms of muscle balance. The Angle Orthodontist, May 1944; 14:13-17.
3. Brunski JB. In vivo bone response to biomechanical loading at the bone/dental-implant interface. Adv Dent Res, Jun 1999; 13:99-119.
4. Misch CE. Density of bone effects on surgical approach and healing. In Misch CE, ed. Contemporary Implant Dentistry. 3rd ed. St. Louis, MO; Mosby Publishing Company; 2008:645-667.


