In early 2019, I met a new patient who wanted to get some cosmetic work done. She had recently graduated with a Ph.D. in neuroscience and was planning a move from Texas, where Smile 360 (our practice) is located, to Las Vegas, NV. She wanted to start her new life with a new smile. For several years, the patient hadn’t smiled in photos because she was self-conscious about her teeth.
After reaching out to friends for suggestions, she found our practice. It turns out that one of our previous hygienists was a friend of hers and had recommended us. Although she lived in Dallas (about a three-hour drive to our practice in Austin), she wanted to meet and consult with us.
During our first meeting, the patient expressed her dissatisfaction with her smile and said her main goal was to correct her front teeth. She told us that she was congenitally missing tooth number 7, and had been told by previous practitioners that the gap left in that space could not be fixed with orthodontic treatment.
The patient had gotten married the previous year, and prior to the wedding, she had some bonding done on her anterior teeth as a temporary solution to the diastema and discolored teeth. However, the bondings were breaking down and chipping. She wanted to find a better solution, despite the fact that her previous dentists hadn’t given her much hope. Upon further discussion, we learned that the patient had gotten bondings done prior to the latest ones, and they had broken down as well.
The Initial Exam
During her exam, I noticed that the patient had a strong maxillary frenum and I confirmed she was missing tooth number 7. She also had a low lip line. We discussed doing anterior, all-ceramic restorations to make the laterals appear present via re-contouring, and shaping her teeth with porcelain restorations.
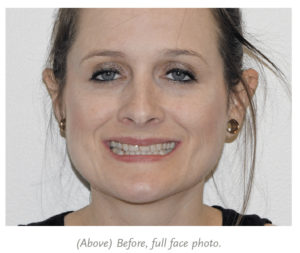 In addition, we noted the following: she had a lip tie and a Class I occlusion, her maxillary midline shifted to the right about 1 mm, the lower anterior retroclined, tooth number 24 proclined with moderate lower crowding, she had omega lower arches, tooth number 28 was in crossbite, and she had a Shimbashi measurement of 16 mm.
I recommended orthodontics prior to the final restorations because of her lower right being in crossbite, which could affect the shape (or look) and function of the teeth on the right side. We also discussed her lip line and doing some gingival contouring to give her teeth a fuller, broader appearance.
 Because she was planning to move in the near future, the patient decided against doing orthodontics (I had determined that her molar occlusion was stable), and she indicated that it might be something that she’d look into later in life.
The patient also opted against gingival contouring for the low lip line, reasoning that no one would really see it. And she chose not to address the maxillary frenum at that time either. I explained that she could do it later on if she changed her mind. Even though her treatment plan was modified from my original recommendation, we were able to agree on a plan that worked with her moving schedule and gave her the smile that other dentists said she would never have.
To begin, we took records, including a CEREC® full arch scan, PVS full uppers, PVS full lower impressions, a bite stick registration, and the American Academy of Cosmetic Dentistry (AACD)photo series. Then we showed the patient photos of some of our other cases so she could see a visual representation of what our practice could do.
Diagnosis and Treatment Plan
After the examination, I recommended the following:
- Elite restorations on tooth numbers 4, 5, 6, 8, 9, 10, 11, and 12
- a nocturnal orthotic to protect her restorations
- occlusion verification with the T-Scan™
- a sleep test to determine the cause of her grinding or clenching
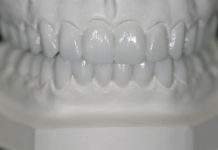
We decided against doing any work on her lowers, but that’s something she may opt to do in the future. We sent her case to Arrowhead Dental Laboratory in Salt Lake City, UT, and informed the lab that the patient was missing tooth number 7. The patient had very worn teeth, and we wanted to conserve as much of her natural dentition as possible. Our goal was to make her smile look natural, and we communicated that to the lab.
The White Wax-Up
When we received the first White Wax-Up from Arrowhead, the patient again made the drive from Dallas to Austin so we could review it with her. She requested a few minor changes. On the original wax-up, tooth number 6 looked a bit “too wide” and did not have the same shape as tooth number 10. We wanted the shape of tooth number 6 to match her congenitally missing tooth number 7. Also, we wanted tooth number 5 to look more like a canine.
The lab accommodated all of our requests. When we received the second wax-up, the patient and I were satisfied with the results and did not request any further changes.
Prep Day
About three weeks later, the patient returned for the prep appointment. The patient was in good periodontal health, so we agreed to move forward.
The full procedure was as follows:
- We prepped tooth numbers 4, 5, 6, 8, 9, 10, 11, and 12.
- Due to the strong lip tie and large diastema that was closed by the previous composite with inter-proximal bonding, we wrapped the prep subgingivally on tooth numbers 8 and 9 to close the 3 mm diastema.
- The diastema was a bit wider than I anticipated between tooth numbers 8 and 9, so we discussed crown lengthening, and I adjusted the margins.
- On tooth numbers 8 and 9, to make things fuller, I went subgingivally on the prep.
- Because the patient had an omega arch, I wanted to fill her buccal smile corridor.
- We prepped for veneers and saved as much of the lingual as possible.
- I utilized the preparation analysis feature with CEREC® post-prep, which allowed me to know exactly how much to prep to the millimeter.
- With this feature, I kept the prep to a minimal amount and still had confidence that the veneers would have the right retention and thickness.
- We chose tooth shade OM3 and informed the lab that her core shade was ND1 on tooth numbers 8, 9, and 10, and ND2 on tooth numbers 4, 5, 6, 11, and 12.
- We were able to use the Sil-Tech® matrix the lab had made based on the wax-up to build the temporaries as one unit, and we spot-etched and placed adhesive on tooth numbers 5, 8, 9, and 12 to tack the temporary in place.
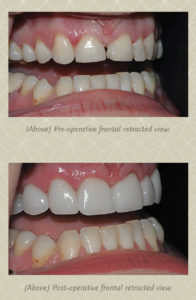 We took photos of everything and the patient was extremely happy with the results of the temporaries. Before treatment, the patient reported that she did not smile very often, so most of her buccal corridor was not visible. With the temporaries, however, the patient was extremely pleased, and we saw more of the smile corridor.
While the final restorations were being fabricated, the patient returned to the practice for a follow-up appointment. We noted that the temporaries were functioning well, and I took a T-Scan® to ensure that the measurements were correct. We made some minimal adjustments and discussed the color of the temporaries. We decided to add more incisal translucency to the final restorations to make her teeth appear life-like.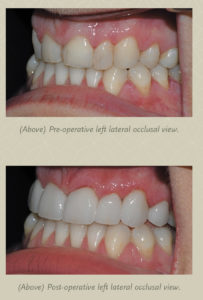
Seating the Finals
We were able to get the Elite e.max® restorations back from Arrowhead in a quick timeframe. Their representatives worked with us to deliver the restorations quickly, knowing that the patient had a limited amount of time due to her upcoming move.
The patient returned three weeks later for provisional removal and cementation of the final restorations. I could tell by the healthy gingival appearance that she had been compliant with her temporary care and had been using the Waterpik® device as instructed.
I proceeded as follows:
- We anesthetized the patient and began to carefully remove the one-unit provisional using a combination of carbide burs (245 and 330).
- After removing all temp material, we cleaned the prepped teeth using a 2% chlorhexidine rinse (Peridex™) and controlled any heme.
- We dry fit the permanent Elite e.max® restorations and checked occlusion, mid-line, margins, and contacts.
- After confirmation of the contacts, we prepped the intaglio surface with Ivoclean for 20 seconds, and then thoroughly rinsed with water spray and dried with air.
- We then applied Monobond Plus universal primer and let it react with the internal surface of the restoration for 60 seconds, then subsequently dried.
- We prepped each individual tooth by pre-etching the surface and using the Adhese® Universal VivaPen® dispenser for 20 seconds per tooth.
- We proceeded with light curing using Adhese® Universal for 10 seconds, practicing four-handed dentistry with two curing lights.
- To prevent canting, we bonded tooth numbers 8 and 9 to allow for an even mid-line, eventually seating adjacent e.max® restorations on tooth numbers 6, 10, 11, 4, 5, and 12, using Variolink® Esthetic LC cement in the color neutral.
- We ensured that the restorations were fully apically seated to the margins of each tooth prior to flash curing to prevent open margins.
- We applied Liquid Strip to prevent any heme oxidization and to help ease excess cement removal.
- Once restorations were fully seated, we cleaned up all bulk excess with a Piezo™.
- I adjusted the opposing tooth numbers 26, 27, and 28 to have the appropriate clearance for the anterior maxillary restorations.
Overall, everything went very smoothly, and we didn’t experience any unanticipated complications. The patient returned 72 hours later for a follow-up appointment. During that visit, we made some minor adjustments and took records for a nocturnal orthotic.
In addition, we made a lower bleaching tray so that she could maintain her lowers and have them match closer to her new restorations until she was able to get more cosmetic work done on her lowers.
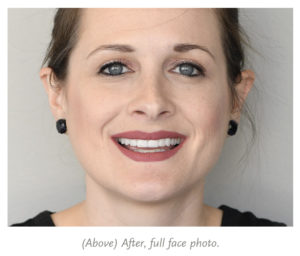
At the end of treatment, we had achieved the patient’s goals of making her appear like she had tooth number 7 when there was none, and of giving her a full smile when she thought it wasn’t even a possibility.
After we seated the final restorations, the patient could not stop smiling. When she got in her car, we watched her from the office as she called her husband—she was smiling from ear to ear! It’s the best feeling to watch a patient’s whole demeanor change in your chair in just a matter of a few weeks.


