

A problem that all dentists encounter, especially when doing large cases, but sometimes even with a single tooth, is what I call “chasing the bite.” Many dentists aren’t aware they are participants in this expensive and time-consuming endeavor. How do you know if you’re chasing the bite?
Chasing the bite is when a dentist has done restoration work, the patient has pain or discomfort afterwards, the clinician makes adjustments to resolve the complaints, and it becomes a repetitive process. This process can go on indefinitely and often results in decreased productivity for the doctor and increased frustration for the patient.
Chasing the bite is when the clinician makes adjustments to resolve the complaints and it becomes a repetitive process.
When I sense that I am starting down this road, I follow this simple rule: If I make more than two adjustments and the problem persists, I put down my handpiece and utilize other strategies. To avoid chasing the bite, dentists need:
- A systemic awareness of the problem
- Tools to rectify the problem
- A clear-cut strategy
A SYSTEMIC AWARENESS
In everyday practice, dentists can become hyper-focused on the tasks at hand, and sometimes they stop seeing the oral cavity as a system of interrelated parts.When this becomes habitual, dentists stop being physicians of the oral cavity and relegate themselves to the role of tooth mechanics. If this happens, a dentist may tweak minor issues on a patient without achieving the optimal outcome of a system in balance.
Especially with large cases, dentists should be cognizant of the context of the musculature and processes of the mouth and head. Failure to do so can result in a seemingly endless series of adjustments that never seem to resolve the patient’s original complaint.
For example, I often observe dentists taking a patient’s bite with the patient lying back in the dental chair. This is usually a recipe for disaster. The musculature of the mouth and jaw change when a patient is in a supine versus an upright position.
When taking a bite, the ideal position for the patient is sitting upright. Many cases are compromised from the outset because a dentist fails to ensure that the jaw, muscles, and tissues are in the optimal position for taking a bite.
Another problem can happen when dentists use a diamond bur for occlusal adjustments. The muscular systems of the human jaw can sense a change of up to 7 microns of pressure. Yet many dentists use a diamond bur, which can remove several hundred microns with a single pass. The sensitivity of the musculoskeletal system requires a less aggressive bur.
A final example is when clinicians misread articulating paper. As the lead instructor for The Dr. Dick Barnes Group (DDBG) seminars, I’ve had the opportunity to train dentists with a wide range of experience. Regardless of how long they have been practicing, many dentists misread articulating paper and make adjustments that further complicate the bite. Articulating paper is not a sufficient indicator for a clinician who seeks precision in their work. It is a dental tool, but it cannot accurately communicate timing and force in an actionable manner.
In dental school, students are taught to look for “donuts” or “smudges,” and to make alterations to mitigate the large marks made by articulating paper. Doing this is counterproductive because large marks are most likely deflection and possibly even a minor force. The more important, and often overlooked, indicators are pinpoint marks.
Think of a wood floor in a house: What is the most damaging type of shoe to a hardwood floor? A high-heeled shoe with a tiny heel. Why? Because the force of the individual’s weight is transmitted to the floor in a very focused manner as opposed to a more traditional shoe, where the force is spread out across a greater surface area.
With articulating paper, the pinpoints represent areas where force is concentrated onto a small surface area. The force results in the patient feeling pain and discomfort. By ignoring the small pinpoints and adjusting the big smudges, a patient’s complaint can easily go unresolved.
Regardless of how long they have been practicing, many dentists misread articulating paper.
I always advise dentists to focus on the pinpoint marks on the articulating paper, and to give secondary importance to the larger smudges. The mouth is a Class III lever, so thinking of the overall system allows dentists to better interpret what the articulating paper indicates.
TOOLS TO USE
It doesn’t matter if you are the best dentist in the world—with the wrong tools, the outcome will be suboptimal. Too often, dentists limit their abilities by only using the tools they used in dental school, or those that they are comfortable with. For dentists who want to avoid chasing the bite, I recommend the following tools:
T-SCAN™ by tekscan™
As noted, without information about timing and force, it is nearly impossible to accurately understand what is happening with a bite.
I always advise dentists to focus on the pinpoint marks on the articulating papaer, and give secondary importance to larger smudges.
We’ve all experienced this: a patient comes in with a complaint that they are hitting hard in one place, so we adjust it, and then they report that the problem has moved to a different area. Without a T-Scan™ to show timing and force, dentists will chase the bite.
I have used a T-Scan™ for more than 18 years. It has been invaluable, particularly for large and complex restoration cases. The chairtime it saves more than covers the cost of the device.
With a T-Scan™, a digital bite sensor transmits the timing and force of each tooth to a digital screen. The dentist doesn’t have to try reading smudges, because he or she has the exact information about where to adjust. Interestingly, the true problem area is seldom the area that the patient identifies.
A T-Scan™ allows dentists to make targeted adjustments and resolve problem areas definitively. Using the T-Scan™ to adjust orthotics works extremely well and can help balance the bites of patients with temporomandibular disorder (TMD) issues.
THE Dialite® Blue POLISHING CUP
A major cause of bite-chasing is over-adjusting one area, which then causes an additional adjustment in another area. I recommend that dentists relinquish the use of a diamond bur for occlusal adjustments.
With information from the T-Scan™, I use the Dialite® Blue Porcelain Polishing Cup to make precise alterations. If dentists use a bur that takes off hundreds of microns at a pass, they can get stuck with over-adjustments that will have them chasing the bite, and may even compromise the outcome of the entire case.
TENSING: A SYSTEM RESET
An appropriate TENSing unit can help a patient’s muscles relax and get into the true resting position. Muscles are key kinetic elements of the mouth, and how they function when a dentist takes or adjusts a bite is critical.
Imagine a patient who is over-closed or stuck in a habitual malocclusion. The patient’s muscles have become unbalanced or strained because they have been trying to compensate for a less-than-ideal position. The worst thing a dentist can do is make adjustments while the musculature of the mouth is compromised or strained.
A TENSing unit subjects a patient’s muscles to a slight electric shock. The shock allows muscles to break out of the normal placement and find a natural position and tension. Once this state is achieved, taking or adjusting a bite becomes more accurate.
Not all tensing units are appropriate for dental use. Therefore, I recommend that dentists use a QuadraTENS™ unit with ultra-low frequency from BioRESEARCH Associates, Inc. This unit is specifically designed for fifth and seventh cranial nerve stimulation.
A major drawback of articulating paper is that it does not give the clinician any information about timing or force.
A BITE JIG
A bite jig is a great tool to use when dentists are changing the vertical on a large case. Its purpose is to maintain the patient’s new VDO during the sequential prepping process.
Arrowhead Dental Laboratory in Sandy, UT, includes a bite jig with a white wax-up for cases that are increasing the vertical of a bite. Using this tool ensures that dentists don’t lose proper VDO as they open the bite.
A bite jig works as follows:
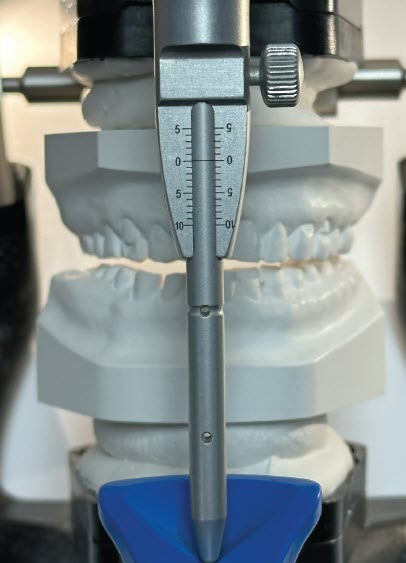
- Take full mouth impressions of the patient. VDO increases are determined by evaluating crown-to-root ratios, periodontal supporting structures, and desired occlusal schemes. Typically, VDO increases are 3–4 mm in the anterior region from maxillary central incisor to the corresponding mandibular incisor. This measurement from CEJ of the upper incisor to CEJ of the lower incisor is called the “Shimbashi” measurement. A normal Shimbashi reading is in the 16–18 mm range for Class I occlusions. The bite registration for VDO increases is called a “swallow bite.” The dentist will determine the new VDO and measure the increase with a Boley gauge.
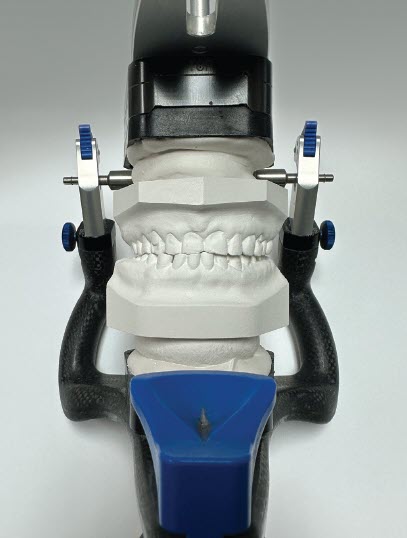
- A dental laboratory will mount the case and models to the new VDO with the use of the swallow-bite registration. The patient is over-closed (as shown in Image 1, below), and the lab will open the bite to the patient’s new VDO (as shown in Image 2, below).
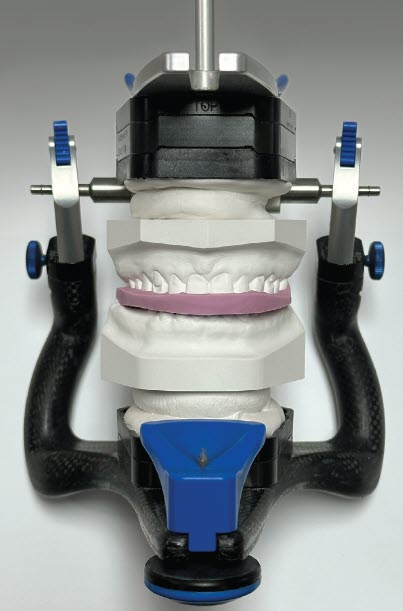
- The lab then fabricates a bite jig that will keep the patient’s new VDO during the prep phase (as shown in Image 3, below).
- At the time of prepping, dentists should reline the bite as necessary to maintain new contact stops inside the jig (as shown in Image 4, below) and ensure the dentist doesn’t introduce inaccuracies that create a bite-chasing scenario. This bite jig will hold the postural position and relationship of the dentition in a 3D relationship of the determined VDO.
- Each time a section is relined, the dentist must verify the new, determined VDO to make sure the patient is positioned properly in it. Once dentists have a systemic awareness of the mouth and the proper tools to help the patient, they then need a sound and replicable strategy to avoid chasing the bite. Here is the strategy I use on every case in which I open the bite on the upper arch:


STEPS TO OPEN A BITE
- Try in the bite jig to verify fit; write the VDO on the bite jig and mark the midline.
- Try in the reduction guide to evaluate reduction needs.
- Determine the new tissue height on the gingiva to achieve symmetry from tooth numbers 5 to 12. Utilize a tissue laser (CO2) to contour the gingival margins. If tissue corrections are done, re-measure for a new tissue-corrected VDO.
- Prep tooth numbers 3 to 6 (keep the most distal posterior teeth and anterior four incisors as holding stops in the jig). Verify with the reduction guide. Cut retention grooves into the bite jig to help retain the bite registration and then reline the jig with bite registration paste on tooth sites 3 to 6. DO NOT OVERFILL. Verify the new VDO with a Boley gauge every time the reline procedure is done (i.e., tooth numbers 8 to 25).
- Repeat and prep tooth numbers 11 to 14. Verify with the reduction guide and then reline the bite jig. Verify VDO (tooth numbers 8 to 25).
- Prep tooth numbers 2 and 15, and verify with the reduction guide.
- The bite jig now has crossbite stabilization holding stops at the new VDO.
- There is no need to reline the bite jig again unless you can ensure that the bite registration material will not seep into the already relined bite. This can distort the bite and cause the VDO to increase.
- Prep tooth numbers 7 to 10, then verify with the reduction guide.
- Follow mesial inclination of the teeth
- Save the cingulum, if possible
- Cut a retention groove into the facial wall of the bite jig.
- Add the bite registration material on tooth numbers 8 and 9, and capture with a horizontal bite stick record that is parallel to a true horizontal. Once the restorations return from the lab, do a try-in before bonding or cementing.
- During the try-in of the restorations, do the following:
- Try-in the posterior molars and second bicus-pids on both sides.
- Ask the patient to gently close, and watch the occlusion bilaterally to confirm that the teeth contact simultaneously.
- Verify the new VDO with a Boley gauge. It’s better to be above the new VDO goal than below it. Adjusting the posterior segments will reflect a rapid decrease in the anterior measurement (a 1:2 ratio change).
- Continue the try-in of the anterior segment and verify long centric parameters (anterior/posterior direction or “freeway” space).
- Get final approval from the patient, and go to the cementation sequence. Once the restorations are secured, only light occlusal adjustments should be done. Wait 48 to 72 hours to take more defined occlusal refinements using the T-Scan™. For the first occlusal refinements, clear the anterior segment (tooth numbers 6 to 11) and establish freeway space in an anterior/posterior direction. This can be done with shim stock or Accufilm®. The dentist should pull the material through when the patient bites in their new centric bite (also called centric occlusion).
- Next, check the posterior segment. Look to see if timing and force are balanced left to right. The centric stops should be on the cusp tips, the marginal ridge, in the valleys, and the upper lingual and lower buccal cusp tips. Occlusal contacts on any incline slopes is not a centric stop—those are typically deflections that must be adjusted.
- Use the T-Scan™ to verify how both sides are coming in as the patient bites. The goal is to come within 5 percent left to right or .04 of a second, left to right. Total occlusal forces should be close to a 50:50 balance. Once in that range, any adjustments should be done with a polishing cup (Dialite® Blue Polishing Cup).
Dentists must have a strategic approach that they follow, no matter how comfortable they become with large-case dentistry.
CONCLUSION
I regularly get calls from clinicians who have done the work to foster a systemic awareness and who have acquired the right tools, only to lose a patient’s bite because they took a shortcut or skipped a step. This is why dentists must have a strategic approach that they follow no matter how comfortable they become with large-case dentistry. A choreographed routine is a must. Chasing the bite is something that nearly every dentist encounters but doesn’t need to keep repeating. With sufficient knowledge, the right tools, and a foolproof strategy, chasing the bite can become a thing of the past. Sink your teeth into that!
GET IN TOUCH
Schedule a Visit
GET IN TOUCH
Schedule a Visit
GET IN TOUCH
Schedule a Visit
GET IN TOUCH


