

I’ve wanted to be a dentist ever since I was in the second grade. My dream came true in 2014 when I graduated from the University of Colorado School of Dental Medicine in Aurora, CO. I’ve been practicing dentistry in my home state of New Mexico since that time. I love helping patients. There’s always a lot to learn and I’m hungry to expand my skills. When one of my colleagues introduced me to the Dr. Dick Barnes Group continuing education courses, it was exactly what I needed.
My colleague and I enrolled in the courses together, and our first course was Full Arch Reconstruction (FAR). Afterwards, I immediately fell in love with large-case dentistry and wanted to share my newfound knowledge with my patients.
The patient population that I treat often has extremely worn-down dentition. I knew that large-case treatments required knowledge beyond what I learned in dental school. The education from the FAR course was what I needed to help my patients with advanced dentistry.
Earlier in my career, I worked at a community health center. The majority of patients there were on Medicaid. Most of them couldn’t afford complex treatments. While I worked there, I made lots of dentures and did a lot of surgeries. The general lack of funds among my patients forced me to get creative. I worked on one patient who basically needed a full arch reconstruction, which I did by building it all up with composite (yes, it took forever). Now that I’ve completed full arch cases with Arrowhead Dental Laboratory, I can testify that it’s much easier placing crowns than building up with composite!

In addition to dentistry, I’ve always been interested in art. I love watercolors, acrylic painting, charcoal sketching, and making ceramics by wheel throwing. I wanted to do more cosmetic dental work because of the artistry involved, but at a community clinic, it’s hard to get such an opportunity. Instead, I became really good at composite build-ups on front teeth. Before I attended the FAR course, I understood what building teeth up vertically looked like, but I didn’t know how to do it by placing crowns.
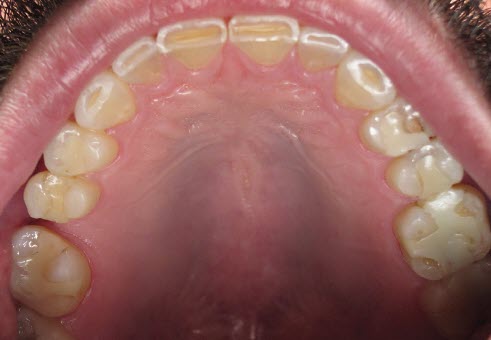
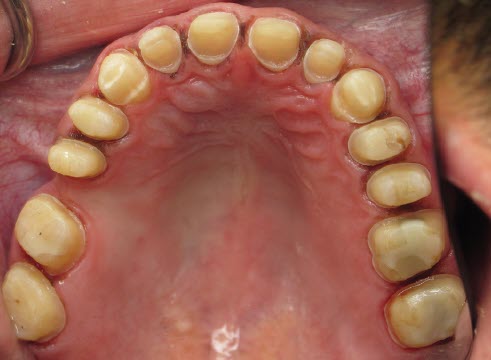
In January 2021, I joined a private practice. Soon afterwards, I cared for a new patient who was a perfect candidate for full arch rehabilitation. He was only 35 years old, but his teeth were already worn down to about half their original length.

I explained the problem to him and said, “You’re too young for your teeth to be as worn as they are now.” The patient said that both his father and his grandfather had the same problem; his grandfather had no teeth left, and his father’s teeth were nearly worn down to the gumline.
I knew that large-case treatments required knowledge beyond what I learned in dental school.
The patient had been self-conscious about his teeth for a long time. He even grew a mustache to cover his smile. When I mentioned the worn dentition, it confirmed to him that it was a real issue. The patient is a handsome man with a bold personality and a boisterous laugh, and his smile didn’t match that personality. I reminded the patient that he had many years yet to live, and that already having teeth worn down so far would likely become an even bigger problem later in life.
A FULL ARCH RECONSTRUCTION
From that appointment forward, everything progressed smoothly. After our initial discussion, I did a consultation and took all of the diagnostics, a diagnostic cast, and a full set of X-rays, and sent that information to Arrowhead Dental Lab so they could confirm it was a viable case. They agreed it was, so I presented the treatment plan to the patient and he accepted immediately.
After five courses with the Dr. Dick Barnes Group, I finally had the knowledge and confidence for this kind of case. It was almost like following a recipe. The patient scheduled treatment for July of 2021.
Before prepping, I read all of the lecture slides from the FAR class, and I made notes on all my questions from the patient’s initial interview. His lower arch had two bridges on both sides, and they were both decayed, so I only did work on the upper arch (tooth numbers 2 through 15), with the eventual plan to replace the lower bridges in the future. I added all the vertical length he needed to the upper arch only. I also noted that the patient had a class III malocclusion and a brachiocephalic facial type.
The wear on his teeth was typical—everything was flattened from back to front. That in itself created further wear. Though he had a class III bite, his bite was end-to-end. The patient wanted to achieve the appearance of a normal bite, where the upper anterior teeth overlap the lower anterior teeth. To do so, we had to increase the vertical and open his bite by several millimeters. I took a swallow bite and a stick bite with the patient standing against a wall, with the parallel lines behind him because I don’t have a symmetrigraf.
After that visit, I made a nocturnal orthotic for the patient to wear for a month. The orthotic opened his bite up by 3 or 4 mm, and he was comfortable so it didn’t require any additional adjustments. The patient had become so vertically collapsed that the orthotic brought him some relief. He remarked that his bite and jaw felt better.
After a month, I started work on the full arch rehab. With the splint, the patient had a Shimbashi of 17.5 mm, and I was able to maintain that vertical with the restorations. Even when temporizing, with the prep, the putty matrix, the temps, and then the final seat, I was able to keep the patient at a
17.5 mm Shimbashi. I was happy that it stayed constant throughout the procedure.
During treatment, two team members took turns assisting. It took about seven hours total; about five hours for the prep, and two hours for the temporizing and cleanup. It was a long procedure for the patient, my team members, and myself.
One thing that helped was making notes for the procedure; I had written down every step that my team members and I needed to prepare for. As I went through the steps during the procedure, I checked them off the list to ensure I didn’t miss anything. We had a team meeting a few days before the appointment and I gave the team those checklists, which included every detail down to the camera, lots of ViscoStat™, and cord. The checklists kept the whole team organized.
During the procedure, I reminded myself that I know how to crown-prep; I do that every day. A full arch rehab is just thirteen crown-preps in one appointment instead of two or three crowns over several appointments!
WHAT I LEARNED
One concern, which is a concern regardless of how much experience dentists or their team members have, is fatigue. This is a long procedure. I wanted my team to assist with all the parts of the procedure without getting fatigued. Ultimately, the team did great and having two assistants was important.
For the patient, the toughest part of the procedure was having enough endurance. There was a lot of crown prep, and a lot of staring at the teeth to ensure the margins were clean and smooth and that the gums were stable and healthy. In addition, the anesthesia kept wearing off. I administered it in phases, so I would get him numb in a quarter or half of his mouth at a time, because I knew it was going to take time to prep so many teeth. It didn’t make sense to numb everything at once. That added some time to the overall procedure.
For myself and my team, the most challenging part of treatment was managing the patient’s comfort. I’m sure he would have been a bit more comfortable if the prepping had gone faster, but that just comes with time and experience.
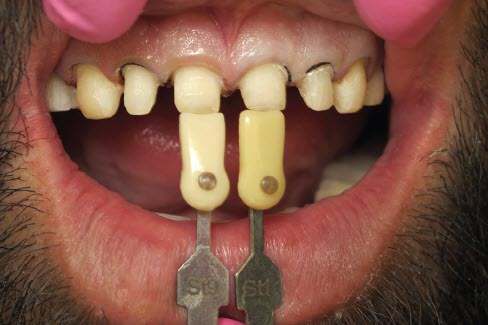
For the temps, I used Luxatemp. We didn’t have any problems with it, and I bought the shade that the patient chose for his teeth. It gave him a sense of what his final teeth would look like.
By the end of the appointment, the patient was amazed! He couldn’t stop looking at himself in the mirror, and he couldn’t stop smiling. He showed everyone his new teeth—every hygienist, every front desk team member, and everyone he passed in the office. And that was with just his temps!
I loved how his temps looked, but as I analyzed them in photos and in the impression, I noticed his midline was off a tiny bit. The teeth looked slightly canted on tooth numbers 8, 9, and 10. I talked to the reps at Arrowhead’s Technical Services, and they made sure to address those issues. The permanent restorations came back beautifully. They were perfectly centered, with no cant. It was great to work with Arrowhead’s tech support department and dial-in everything perfectly.

I wanted my team to assist with all the parts of the procedure without getting fatigued.
I asked the patient to return for a one-week post-op check to make sure his gingival tissue was healthy, that he was tolerating everything, and that he was doing the necessary at-home care. Since he’s got a powerful bite, I was nervous that the patient might crush his temps, and I didn’t want them to break. The one-week post-op check gave me the chance to verify that everything was okay.
The patient’s gums were slightly irritated because he wasn’t able to clean in between the temps. But the temps themselves looked good. The patient followed the home care guidelines based on Dr. Jim Downs’ recommendation. The patient did an excellent job of keeping the temps and his gums as clean as possible.
He was in temps for about a month, and we removed them at the beginning of August. I admit that taking them off was nerve-wracking. I didn’t want to break his teeth, and I worried that I was applying too much pressure. I was using a bur to cut through the temps, and I didn’t want to hit the teeth, so I worked slowly. I remembered to breathe and take my time, and it all worked beautifully.
For the permanent restorations, I used Arrowhead’s Elite e.max® for the anterior teeth (tooth numbers 6 to 11), and for the posterior teeth I used full contour zirconia crowns because of the patient’s powerful bite.
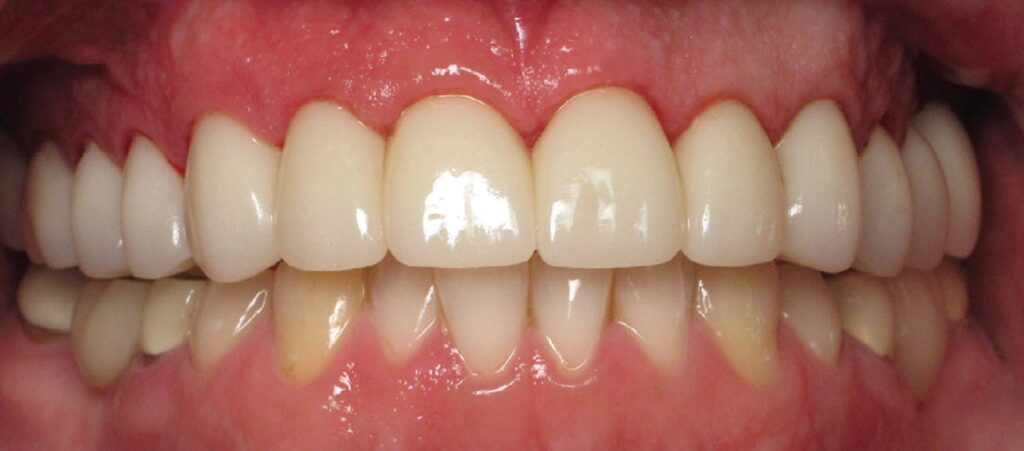
Once the crowns were seated, the patient was even happier than he was in the temps because he could floss between his teeth. He kept saying how shiny and pretty they looked. He was so happy, he eventually brought in the rest of his family to the practice as patients.
Since finishing the restorations on the patient’s upper arch, I have started work on his lower arch by replacing one of his decaying bridges. We have yet to replace the other bridge and we need to crown a few of his lower premolars. Because the patient is young and does not have heavy staining, we didn’t have to do any bleaching on the lower anterior teeth to match his upper crowns.
The patient is wearing a nocturnal orthotic that is fitted to his current bite. Over time, we will tackle the rest of his lower arch. We might have to remake the orthotic again, but that’s not a problem.
CONCLUSION
If I were to give advice to dentists taking on a full arch restoration for the first time, I’d say that it’s important to take time to explain things to the patient, and then study the case intensely. Yes, things can go wrong, but the process I learned at the Dr. Dick Barnes Group is the closest you can get to guaranteeing a successful outcome.
The mentorship that Dr. Downs and Arrowhead Technical Services provided throughout this case was invaluable. They taught me how to look for the kinds of cases that would help me gain confidence with large-case dentistry. To get started with full arch reconstruction, look for something manageable and take the time to find something within your reach. You’ll learn more and more, and it will all be worthwhile.


