
Guided Surgery for Single-Tooth Implants.
When patients ask about the success rate of dental implants, I usually respond, “97 percent.” I know the numbers vary somewhat, but nearly all the data falls somewhere in the 90-plus percentile. From personal experience, I know that if I follow proper protocol and use good surgical procedures in a healthy patient, all implants will integrate. I’ve seen it thousands of times.
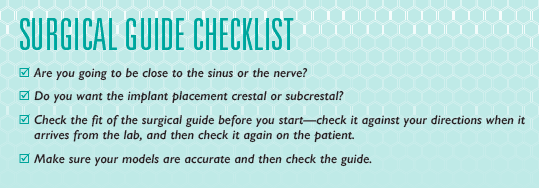
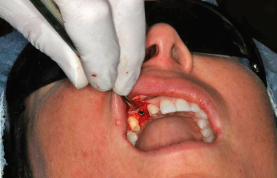
But just because we get osseointegration, is the implant successful? What does success mean? I recently witnessed a patient return to my office after having gone to a “less-expensive dentist” who used a “less-expensive lab” (see Figure 1, below). Was this a success? The implant integrated and the crown was placed. However, it is easy to see why the patient was unhappy with the result.
![]()
The dentist placed the implant at the wrong angle and too far to the mesial, thus creating a cantilever on the distal. As a result, food was constantly trapped in the distal and there was bone loss around the implant. Was this a success? Absolutely not.
Defining Implant Success
As dentists, we need to think beyond integration. Many factors contribute to success with implants, including tissue quality, emergence profile, abutment selection, contacts, ease of hygiene, occlusion, and many more. In the following paragraphs, we will focus on just one factor—implant placement.
With easier access to cone beam computed tomography (CBCT), implant placement is now much more predictable, and lasers now have applications in socket grafting. Sometimes when a dentist takes a tooth out, the socket is full of pus. Today, the dentist can clean it all out with a laser and pepper the inside of that socket. Doing so kills off any other bacteria so that when the dentist places the bone graft material, it will heal and adhere better. There are many other applications for lasers too.
It’s also helpful to use guided surgical templates. I’ve been placing implants for almost 20 years, and when I first started I had to use a guide with only a pilot hole and tomogram. Hopefully most dentists have invested in CBCT by now and understand the benefits of such images. Originally, I only had access to a mobile CBCT that would come to my office. When they became more affordable several years ago, I purchased one.
How to Begin
Surgical guides are customized guides that doctors can use for implant placement and implant surgeries in order to refine angulation and placement. The role of a surgical guide is to help dentists do their work better and with greater accuracy, safety, and predictability. With the guides, implant placement is precise. Surgical guides are not currently used as a baseline of care, but maybe someday they will be.
Many dentists think of using surgical guides only when doing complex cases. However, guided surgery is here to stay and can be useful for single-tooth implants. Think about how the implant in Figure 1 would have been a success if a surgical guide and proper treatment-planning from the crown on down had been used.
I’ve made mistakes like that too, and I’m very experienced at free handing implants. However, surgical guides make the implant position, angle, and depth more accurate and safe. Overall, they contribute to better success with the implant and with the restoration that follows.
I especially like to use a guide in cases where there is little room for error—for example, in the aesthetic zone or where bone dimensions are less than ideal. I like to see a minimum of two millimeters in the buccal. If there is anything less than that, I use a guide and osteotomes, and augment with tissue and bone. It’s very rare that I don’t augment bone and tissue in the aesthetic zone.
I recommend having an implant representative at the first few guided surgeries for the particular type of implant that you are using. All guided surgical kits have differences, and if a dentist is unfamiliar with a kit, it is important to have help throughout the process.
Another thing to keep in mind when starting to use surgical guides is to go slow and easy. Try it out on a case where you’re not worried about sinus issues, or maybe on an upper bicuspid area where there are no nerves, or where the sinus is out of the way and there is a little more allowance for error.
![]()
A Case Study
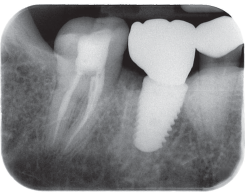
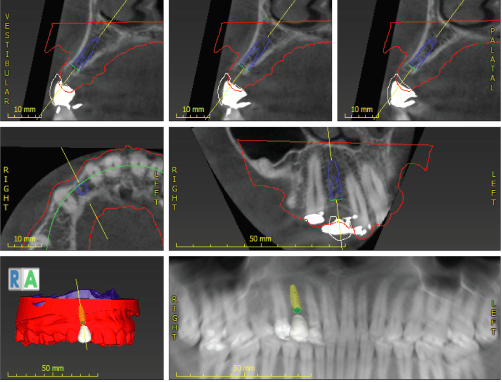
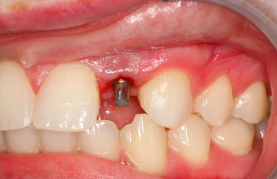
Consider a recent case in which I used a surgical guide: “Lindsay” is a 37-year-old female who is missing tooth number 6 (see Figure 2, above). She has a bridge with recurrent caries under the lingual retainer on tooth number 7. She is unhappy with the appearance of her teeth, and in the future plans to do more comprehensive work to improve her smile and replace the retained deciduous tooth in position number 4. However, the current plan is to remove the restoration, place an implant in position number 6, and remove caries on tooth number 7.
![]()
![]()
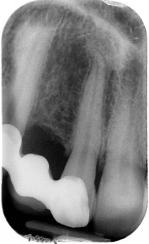
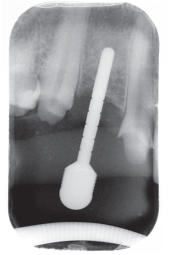
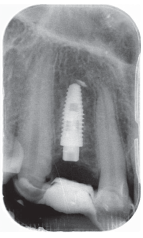
Tooth number 7 was prepared for full coverage and used to retain a Radica™ provisional while tooth number 6 was healing. On the initial PA radiograph of tooth number 6, mesial distal dimension looked adequate (see Figure 3, above). However, after CBCT, we noticed four millimeters in the buccal lingual dimension (see Figure 4, above). I like an implant 3.5 millimeters or smaller for aesthetic restorative areas, if possible. Neodent and others make a small diameter implant, but restorative options are somewhat limited.
In this case, we chose to augment the area with resorbable membrane and particulate graft, and also used an osteotome to expand the osteotomy. There was little room for error buccal lingually as well as mesial distally. A surgical guide was used to help ensure accurate placement. Accurate models and a copy of the CBCT were sent to Arrowhead Dental Laboratory.
They were instructed to fabricate a surgical guide for a Neodent 3.5 by 11.5 implant to be placed two millimeters subcrestal. We also instructed them to fabricate a Radica™ provisional for tooth numbers 5 to 7, with pontic just at tissue level. The pontic can be adjusted as needed but it helps develop papillae as the implant heals. The pontic should have light pressure in the tissue.
Photos and shade tabs were also sent to the lab. The lab sent an email with Dental Wings software showing the implant as requested, and I checked off on the virtual implant placement. Dentists should always specify if an implant is crestal or subcrestal and by how much (see Figure 4, above).
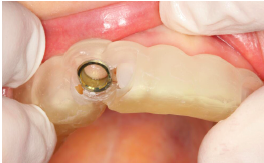
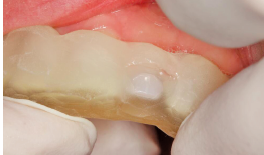
When the case was delivered, I checked the fit of the guide on models, and then again in the patient’s mouth (see Figures 5 and 6, below). The surgical guide must fit precisely. There are windows in the guide to see that it is seated properly. Check the provisional bridge to make sure it is fabricated correctly. I often ask the lab to provide a wax-up of the tooth that is in the implant site position. They will make a Sil-Tech® stint that can be used over a temporary abutment.
In this case, after anesthetizing the patient, tooth numbers 5 and 7 were prepared for the provisional bridge. After adequate implant healing, the margins were modified and final impressions were taken. The provisional was lined with Luxatemp® and the pontic was modified with closure of the flap. I checked the occlusion and the operatory was prepared for surgery.
![]()
![]()
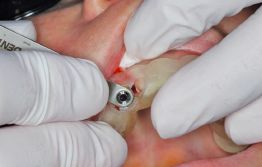
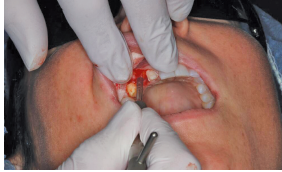
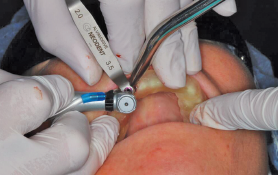
The Procedure
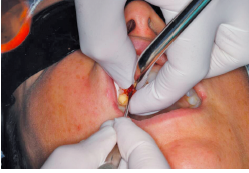
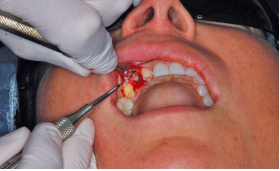
First, I made an incision using a DEKA CO2 laser (see Figure 7, below). The full thickness envelope flap was reflected to allow easy visualization and access for augmentation (see Figure 8, below). The surgical guide and key showed me where to place the implant, using firm pressure and checking the windows (see Figure 9, below). The pilot drill was started to half final length. A radiograph was taken to verify angle and accuracy (see Figure 10, below).
It is very important to verify the guide as you work! Though rare, the guide occasionally may be incorrect. Dentists should not immediately drill to full length if there is little room for error. Verify and feel inside the osteotomy. Dentists must develop the skills necessary to correct the placement if for some unusual reason the surgical guide is off.

![]()
![]()
![]()
![]()
After verification, I took the pilot drill to full length (see Figure 11, below). The Neodent implant that was used was designed to be placed subcrestally. Because of the stress on a canine, the decision was made to place the implant three millimeters below the bone, but that was a personal preference.

![]()
Once the final length was confirmed, I began expansion of the osteotomy site with multiple diameter osteotomes (see Figure 12, below). After progressive expansion was achieved, the guide and key were placed and the final 3.5 millimeters was drilled to a depth of five millimeters (see Figure 13, below).
![]()
![]()
Remember, the goal was to maintain and maximize the buccal plate thickness. In other types of bone, I might have omitted this step or drilled to length. Also, in anterior areas, the lingual plate can be very hard and I find it helpful to use a side-cutting (Lindemann) drill to relieve this area. If not, the implant deflects off the lingual and will cut through the buccal plate. Again, verify that the buccal plate has not been perforated.
A Neodent 3.5 by 10 millimeter implant was then put to bone level. I reserved the last few millimeters to be placed by hand so that I could check for tightness and for slowly expanded final bone (see Figure 14, below). I checked to see if any threads or a shadow buccal plate were showing.
![]()
I prepared the site for augmentation and began the process with hydrated Kontour™ Sustain Collagen Membrane and DirectGen™ Allograft (cortical-cancellous blend) (see Figure 15, below). In this instance, I chose to close the flap with no sulcas former or temporary abutment because of the provisional we had available. Sometimes, as in this case, I close using a temporary abutment and crown (see Figure 16, below). A small three millimeter healing screw was then placed so that bone would not cover the implant. I then took a final radiograph with the provisional in place (see Figure 17, below).
![]()
![]()
![]()
Conclusion
Again, it’s important to ask, “What is success in implant dentistry?” It starts with great treatment planning and accurate, safe placement. Guided implant surgery should be a part of every dentist’s armament for single-tooth implants.
All dentists have seen great systems using guides for multiple implants with same-day loading. Dentists can take a complex multi-implant case from start to finish with a CBCT, great models, and fabulous software. However, dentists should also look at everyday, single-tooth implant cases—particularly in cases where tenths of a millimeter can make or break the outcome of a restorative case. With a surgical guide, the results can be much more precise.
Guided surgery can mean a happy patient—where the implant and restoration seem to be a seamless part of the natural dentition. Without guided surgery, an implant tooth may never seem to be a natural component of the dentition—or worse, may constantly catch food in a trap and expose sore, red tissue.
Costs have been reduced on surgical guides, and the turnaround time to fabricate the guides has improved dramatically. In addition, most implant companies offer guided surgery kits. The kits remove some of the stress and can improve productivity during the implant placement.
The next time you place an implant for a somewhat straightforward single tooth, consider partnering with a lab like Arrowhead Dental and use a surgical guide for precise placement. You may be surprised by the results.