

Tips for Tissue Contouring and More.
Aesthetic dentistry combines the best of art and science to give patients beautiful and functional smiles. When working on large cases, dentists painstakingly detail the specifics of smile design to create the highest aesthetics. They combine this effort with materials and techniques that result in long-lasting smiles.
Elements of smile design include considerations of incisal length, tooth proportions, zenith points, axial inclinations, occlusion, and more. But to achieve the highest aesthetics, dentists should always include gingival considerations as well.
I like to think of smile design in terms of a beautifully framed piece of art. The dental restorations and smile are the artwork, and the gingival contouring provides the best-looking framework for the picture. Everyone notices the teeth—but they are framed by the gingival tissues. Even if a case involves making minor changes to the teeth, gingival contouring should always be considered.
Many doctors aren’t sure what to do when they encounter “gummy” smiles. But that’s no excuse for ignoring this important area. When the porcelain work looks beautiful but the gingival heights are not the same, the result is teeth that look uneven. Properly contouring the gingiva can take a case from “good” to “WOW!”
Instruments for Contouring
A number of instruments and technologies are used for gingival contouring. Years ago, the standard instrument for contouring was simply a scalpel. Of course, that can result in bloody, painful treatment that takes a long time to heal. With a scalpel, dentists have to do contouring weeks in advance of the restoration process—often eight weeks of healing is required. Using a scalpel also means that the patient has to undergo multiple procedures, and the results are not predictable.
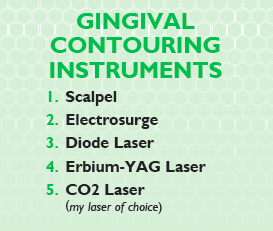
Another instrument that dentists used in the past for this purpose was an electrosurge. An electrosurge is an electrified wire that can cut through and cauterize tissue. Electrosurgery has been around a long time. A drawback of this method is that the thermal kill associated with the burn results in unpredictable tissue heights. It’s also somewhat painful for patients and must be done weeks in advance.
More recently, advancements in technology have offered lasers for tissue contouring. These generally have a better wound response and are available with different wavelengths. Diode lasers were the first lasers introduced into the field and are probably the most common.
Diodes lasers are fairly compact instruments. They’re solid-state units, and they require the dentist to touch the tissue with a fiber tip. They also have a thermal kill—their purpose is to seek out pigmentation and burn it. The energy from the diode is absorbed into pigmented structures, including blood cells.
Diode lasers should be used prior to the anterior teeth preparations that require additional gingival height changes. Remember, it takes anywhere from six to eight weeks for the gingival tissues to heal and mature before preparation of the teeth.
Another laser available for dentists is the Erbium-YAG laser. It’s a multi-purpose laser unit with a lot of flexibility. Gingival tissue is 90 to 97 percent water content, so the Erbium-YAG laser uses a very specific wavelength. Dentists use a certain setting for hard tissue and a certain setting for soft tissue.
In inexperienced hands, the Erbium-YAG laser is not very clean-cutting on soft tissue. A patient may experience significant bleeding, and there may be irregular margins when it heals. When a dentist does gingival contouring, he or she needs great visualization, and bleeding can interfere with that.
CO2 Lasers
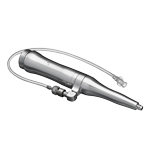
My laser of choice is the carbon dioxide laser (CO2 laser). Through a process known as ablation, this laser vaporizes tissue by reaching a temperature of about 100 degrees Celsius. For the patient, tissue healing is instantaneous because the gingival tissue, blood vessels, nerve endings, and lymphatics are all sealed on contact. That means the tissue dries immediately, and dentists can ablate with precision. Wherever the dentist ablates, the tissue will stay and even regenerate.
This laser can be used on the same day of prepping for a major procedure. This is a big advantage for most patients because it means they only have to be anesthetized once. The CO2 laser is a more expensive investment, but the return on investment (ROI) is great because there are so many applications for it. Once a doctor becomes proficient with this instrument, he or she will never give it up.
Advantages of CO2 Lasers
One benefit of a CO2 laser is that it is less painful for patients. It also offers precision for symmetry. When patients smile, from the midline of their two front teeth going left and right, it should be symmetrical. With this laser, dentists can quickly achieve symmetry.
If a doctor knows where he or she is going to be prepping, and then preps the tooth and finishes the margin line where the tissue has been removed, the tissue will return about half a millimeter and cover the margin when it rehydrates. Some doctors think they need to prep below the gingival margin to hide the margin of the restoration, but that isn’t the case with this laser.
Using a CO2 laser also means that dentists don’t have to put packing cord around every tooth, which can hurt or injure the gingival attachment. With a CO2 laser, dentists can skip the packing cord step. Plus, there is no need for reordering tips, fiber wands, or additional supplies for this laser like there is with the diode and Erbium-YAG lasers. Dentists and patients alike get beautiful results.
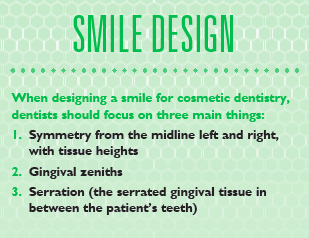
Smile Design
When designing a smile, dentists should focus on three main areas. One is symmetry from the midline left and right, with tissue heights. The second is the gingival zeniths. The last is the serration, or the serrated gingival tissue in between the patient’s teeth. Some people have bigger triangular serrations than others, so dentists need to understand how to slenderize them, and how to create more pleasing emergence profiles.
A typical periodontal sulcas around a tooth is anywhere from one to three millimeters. A general rule of thumb is that dentists can remove tissue up to one millimeter shy of the gingival attachment, also known as the junctional epithelium. A patient might have as much as four millimeters of gingival tissue in some areas.
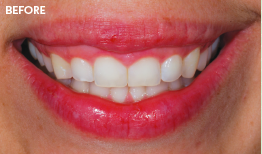
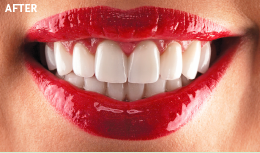
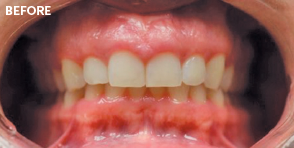
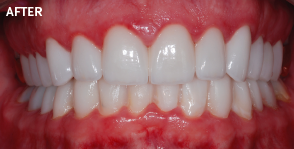
One of my patients, Ashley Monteer (see photos at the start of the story), had hypertrophy, meaning she had an extra growth of gingival tissue. In some places, there were three millimeters of tissue, other areas had four millimeters, and a couple of areas had two millimeters. That’s why dentists should understand and measure a patient’s periodontal pockets. For Ashley, we had to do soft tissue removal. Crown lengthening, which requires bone recontouring, was not needed.
Some doctors would look at a case like Ashley’s and send her to a periodontist. A periodontist would have to perform a crown-lengthening procedure. With this process, the potential for black triangles at the gingival level between the teeth is increased. Black triangles are not aesthetically pleasing and are very hard for the dentist to fix.
When looking at golden proportions for aesthetics, remember that aesthetics are not just about adding to the length of the tooth. Often, the process includes a combination of lifting the gingival tissue and adding length to the end of the tooth.
Some patients have medical conditions that promote gingival growth, in which case gingival contouring can reduce the overgrowth and provide a nice, aesthetic look for the patient. Good photography is important because it allows the doctor to look at the case when the patient is not there. By looking closely at photos, full mouth models, and facial types, dentists can determine what they need to do to start developing the smile.
Always look at the whole mouth, not just at the teeth. Remember the golden proportions, the height and width ratio of the front teeth, and the midline. Such things should dovetail nicely into the tissue design.
If a patient has recession, discuss it with him or her prior to beginning a cosmetic case. In our practice, we use the Pinhole Surgical Technique™. With this procedure, the gingival tissue is released from above the teeth that have the recession, and is moved down over the recessed area to re-adhere. With this procedure, the patient does not need flap or gingival grafting, and he or she feels less post-op pain.
The only disadvantage to this method is the relatively long amount of healing time. The gingival tissue needs to re-establish itself and mature, so it can take as long as six months before the tissue is ready for the restorative phase of treatment. With Ashley, five millimeters of her gingival tissue were initially showing. We got it down to three millimeters. Some doctors adhere to a standard of having only two millimeters of gingival tissue showing, but it’s really up to the patient. Ashley’s smile shows some gingival tissue, but it looks fine because everything looks proportional.
Techniques for CO2 Lasers
When a dentist buys a laser, some dental boards require him or her to take a laser proficiency course. In that course, dentists practice using the laser on different substrates. The dentist needs to know what applications to use it on. It’s a must.
A great way to practice using a CO2 laser is to use it on something like a piece of raw chicken. Dentists can also learn how to hold and position the laser by using it on a tomato or a hot dog. With practice, dentists get a sense of how the laser cuts.
I recommend using a two-handed technique, which gives dentists much more precision. When ablating tissue, dentists should slow down and use the proper wattage for that particular procedure. The tissue will ablate better and it actually will take less time than rushing through it. I sometimes notice doctors using a laser like a windshield wiper, going back and forth. That usually doesn’t work because the laser has to stay on the tissue long enough to ablate.
Another pitfall to avoid is trying to create a serrated papilla point between the teeth. Dentists should never take the laser from the contact point down through the fine point of the papilla apically. Sweep from the midline of the tooth to the contact point on both sides. With this technique, you will avoid the formation of black triangles.
Tissue contouring is great when doing a bridge if the dentist knows how to create ovate pontics. The underbelly of the pontic has to rest on gingival tissue so dentists can create an ovate that looks like a tooth growing right out of the gingiva instead of a ridge lap appearance. CO2 lasers are a great way to create that ovate, which is egg-shaped or oval in appearance.
Other Uses for CO2 Lasers
CO2 lasers have uses beyond tissue contouring. They can be used for many dental applications in everyday dentistry, particularly in hygiene and on the periodontal side of dentistry. CO2 lasers are exceptional in dealing with problems related to periodontal disease.
On the restorative side, dentists can utilize this laser for troughing below the gingival margin to expose decay, and for extending tooth structure for a final restoration. This can be useful in situations where a dentist takes out a big filling on a back molar, and discovers that the decay has gone below the level of the gingiva. At that point, it will usually start bleeding and can become an issue for the final restoration.
Instead of packing cord around the tooth to try to keep the gingival tissue off the margin of the prepared tooth, the dentist can use the CO2 laser to remove the inflamed tissue and dry it up. Dentists don’t have to waste time making a second impression because it started bleeding when they pulled that cord out and they couldn’t see the margin—which is likely the number one issue for margin identification at the dental lab.
Today, the art of saving teeth is becoming somewhat rare because doctors often just take out a decayed tooth and place an implant. With a CO2 laser, even if the decay goes below the gingival line, it is possible to save a patient’s tooth. Patients appreciate it when a dentist can do this.
In areas where the gingival tissue has been damaged, dentists can simply remove the tissue and allow healing to happen rapidly, all with minimal downtime and minimal post-op trauma or discomfort. That’s a win-win for patients and dentists!
Another great use for a CO2 laser is in performing frenectomies. Frenectomies involve removing a small piece of tissue underneath the lip or under the tongue. Sometimes the tissue tendons are situated in such a way that they prevent the tongue from operating in its full range of motion.
Doctors with CO2 lasers can perform frenectomies on infants who can’t breastfeed or bottle-feed because they can’t latch on and suckle. The CO2 laser is the best laser for this procedure due to no anesthetic being needed on infants. On older children, those areas will need to be anesthetized afterwards. The youngest patient I’ve ever performed a frenectomy on was just two days old.
CO2 lasers also have applications in socket-grafting. Occasionally, when a dentist removes a tooth, the socket is full of bacteria. After debriding the socket completely, the dentist can use the laser and pepper the inside of that socket. This will kill off a substantial amount of bacteria, so that when the dentist puts the bone graft material in, it will heal and adhere better.
In cases of peri-implantitis (inflammation and infection around an implant) the CO2 laser can be used to clean the surface of the implant. If needed, the dentist can graft bone around it and close the site, and the patient can keep using the implant.
Safety and Preparation
When using a laser, everyone in the room should be wearing protective eyewear. There are no real contraindications and no special precautions for bleeders or patients who have pacemakers. Hygienists can use the laser in their everyday work, as long as they have their proficiency certification for it.
When using a laser, always probe the gingival pocket before lasering tissue. For anterior or cosmetic cases, ask the dental lab to make models. Dentists can dictate to the lab technicians who make the wax-up how far they should take the tissue up.
I typically take a red pencil and outline where to take it up, so that when I send the model to the lab, the tech knows not to go beyond that red line. The White Wax-Up generates the finish line of the preparation. A reduction guide can be a perfect tissue guide as well, because it’s based off the wax-up and can therefore provide precise guidance.
Conclusion
Using a CO2 laser improves and expands a dentist’s skill set. CO2 lasers are great for tissue contouring—which should be a part of everyday dentistry—and have several other uses as well. When working on highly aesthetic cosmetic cases, it can be tempting to focus on the restorations. But don’t neglect the beautiful framework when doing aesthetic work. Make tissue contouring a part of every aesthetic case, and the artwork and frame will be perfectly complementary.


