

TOP TIPS FOR TAKING GREAT DENTAL PHOTOGRAPHS.
They say a picture is worth a thousand words, but if the picture isn’t properly taken, you have a thousand words saying the wrong thing. In traditional photography, this may not be a big problem. If something doesn’t turn out the way you like, you can simply Photoshop out the imperfection and the image will likely be good enough to pass muster.
Dental photography is a completely different ‘animal,’ especially when the images are used by a dental lab to fabricate an aesthetic case. In such situations, “photoshopping” the color or contrast of the image may actually create more problems than it solves. With dental photography, the subjects are a constant challenge and the difficulties involved include creating dynamic images of a small, white, semi-opacious object in a manner that is a true representation of the dentistry.
The topic of dental photography is too large to be comprehensively addressed in a single article, so the following key camera settings will get you started taking effective dental photographs. In order to help start as easily as possible, you should learn a bit about two basic aspects of dental photography—equipment and settings.
Equipment
As with any endeavor, great outcomes are only possible with the right tools. For this reason, please note that the camera on an iPhone or iPad is not sufficient to capture effective dental imagery. If you are currently using such a device or even a consumer-grade digital camera, your pictures are misrepresenting what you are hoping to communicate.
In order to be successful at capturing the most useful images for your dental laboratory, you are going to need three things. First, you will need at least an entry-level, professional grade digital camera body. Canon and Nikon are brands that offer excellent products at reasonable prices. Second, you will need a good quality macro lens (approx. 100 mm) for the close-up nature of dental photography. Dental photography is one of those applications where the built-in lens of a consumer grade camera just won’t do. If you can’t take the lens off the camera body, the camera won’t be sufficient—even if the camera has a macro setting. Lastly, you will need a good quality ring flash (a circular flash originally invented for dentistry that is attached to the lens). The ring flash is essential for getting the proper lighting, both from an intensity and temperature standpoint. The traditional top mount flash will not deliver the kind of lighting that really makes your images ‘pop.’
When discussing modern digital camera equipment, it is easy to become overwhelmed at the many options available. The prospect of trying to evaluate all the features and determine an effective dental photography kit can seem daunting. Luckily, some companies have done all the research and offer a number of camera kits specifically for dentists. Go to the PhotoMed (www.photomed.net) website or click on the “Dental Photography” tab on the Norman Camera (www.normancamera.com) web page. There, you will find a number of camera kits that will meet the needs of almost any dentist. The cost typically runs between $2000 to $3000 for a complete kit. The most highly-recommended camera kit for dentists is the Canon 70D dental kit (approximately $2,499 at Norman Camera). It is a reasonably priced kit and offers all the key features that a dentist may want or need.
Settings
The primary reason for selecting a professional camera body has everything to do with camera settings. Most consumer cameras have very few settings, which limits their capabilities—especially when highly detailed or exacting imagery is desired. While this lack of configurability makes such cameras easy to operate, they were built using basic assumptions that limit the results you can achieve.
Professional cameras, even those classified as entry level, have highly configurable settings that empower you to take truly amazing images of your dentistry. But don’t be too concerned at the prospect of having to configure one of these cameras. With just a couple of simple settings, you can get started within a few short minutes of reading this article.
To get you started, we are going to focus on three key settings: shutter speed, aperture (also called the f-stop) and ISO (International Standards Organization—the term ISO refers to a camera’s sensitivity to light). If you have your camera accessible as you read this, take a moment to program your camera before making the setting changes that follow. Your camera probably has a wheel like the one shown on the left below. Change it, if necessary, so that the camera is set to M (which stands for manual). This will allow you to make the setting changes, below. If you select any other option, the settings will be programmed to predefined values, which will not work for dental photography.
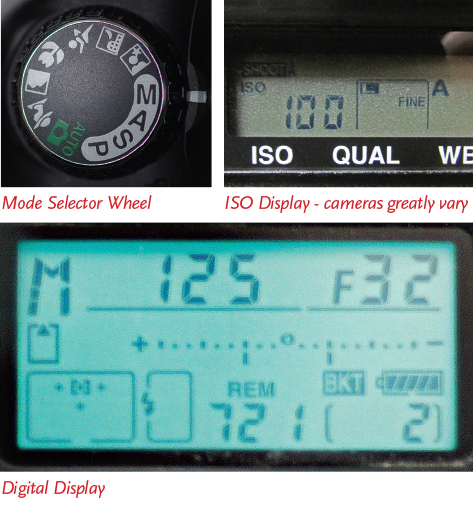 The bottom image on the left is the digital display that is common to most professional-grade digital cameras. While there may be some minor differences in the display between the Canon and Nikon cameras, both cameras will typically show all the information we will be discussing and the actual setting will generally be the same for both cameras.
The first setting to notice is shutter speed, which is simply the period of time the shutter will be open to capture the image. With most dentistry, you will be shooting with a shutter speed of 1/125, which will probably show up as just 125 on the digital display. We could go into a very detailed discussion of shutter speed and why we recommend 125 but that would be beyond the scope of this article. Suffice it to say, 125 will work well in most dental applications and it is a good place to start for those who are new to dental photography. If you want more information on shutter speed, a number of great tutorials are available on YouTube.
The next setting to discuss is the aperture, which is most often represented by the f-stop number. When it comes to camera settings, aperture is the one that most people struggle with. To make it easier, think of the aperture akin to the pupil of the human eye. Its function is to regulate light. In a bright room, the pupil constricts to limit the light entering the eye and in a dark room, the pupil dilates to allow more light. The f-stop is a numerical representation of light being allowed into the camera.
A good rule to follow is that the higher the f-stop number, the less light that is allowed to hit the camera sensor. For close-up dental photography with the shutter speed set at 125, a good f-stop value is around 32. If you are taking headshots of a patient, you can back the f-stop down to eight. The reason you are using an f-stop of 32 for the close-up images of the teeth is because the ring flash should be providing an intense light source close to the subject. If you allowed more light (lower f-stop) into the camera, the image would become washed out.
A good way to get an intuitive understanding of this is to experiment with the f-stop and see how the images change. A great deal more could be said about the f-stop and its relationship to shutter speed, but for the purposes of getting started, this should be sufficient.
The final setting is the ISO. As noted earlier (in very basic terms), ISO is a measure of the camera sensor’s sensitivity to the available light. By increasing the ISO, a camera can capture images in low light environments without using a flash. The increased sensitivity, however, comes at a price—with increased graininess or “noise” in the image. Since your camera will be outfitted with a ring flash, there is no need to set the ISO to a level higher than 200. In most situations, you will want to keep the ISO at approximately 100. A lower ISO setting will ensure that your images are free from noise and have the maximum level of detail possible. Try some experimentation to get a better understanding of this setting. Keep the previous settings (shutter speed and f-stop ) the same and change the ISO to see how the image changes with increasing ISO values.
The subject of dental photography is a rich topic that could fill an entire book and still not address everything. Becoming proficient in capturing dental imagery is a critical skill that should be taken seriously by every dentist. Not only is it important to show patients your dentistry, it is critical for communication with your dental lab. Dentists who can provide dental labs with high-quality images find that their cases look better and the number of remakes due to shade problems dramatically decreases.
If you have tried dental photography and felt frustrated in the past, now is the time to try again. Make sure you have the appropriate equipment and start with the simple settings discussed earlier. You will be amazed at how much better your images are and how much better the communication is with both your patients and your lab. Future articles will investigate this subject in further detail, but until then—happy shooting!


