ELIMINATE PATIENT FEARS AND OFFER LIFE_CHANGING DENTISTRY.
A while back, some longtime patients of mine referred their friend “Jane” (name has been changed), a mother and grandmother, to my practice. These friends tried to convince Jane to visit my office for more than a year, and she finally agreed.
Jane was a bit dental phobic at the time, and rightfully so. She had experienced some very negative and costly outcomes on recent trips to the dentist.
From our first visit, I was impressed with Jane’s amiable and pleasant personality. She was reliable, punctual, and just an overall nice person. Jane’s main reason for her visit was to see if I could help repair the work that her previous dentist had done.
Jane’s Concerns
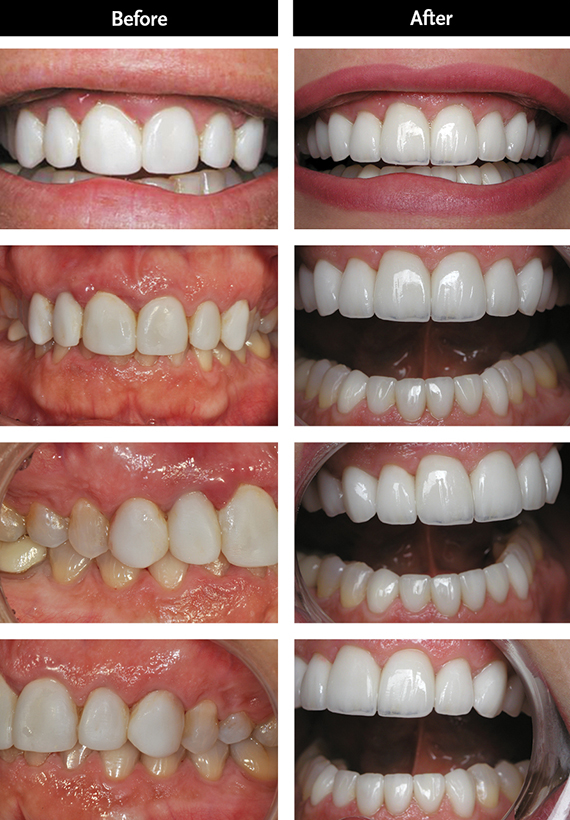
About a year prior to her visit to my office, Jane had porcelain veneers placed by her previous dentist on her six top front teeth (numbers 6 to 11). From the very beginning, she was unhappy with them. She said that they just never felt like they belonged. The veneers felt bulky, flat, uneven, and most of the time were so uncomfortable that she just wanted to “rip them out.” In addition, food frequently got stuck behind them and she thought it looked like the surface of the teeth had “divots” in them.
Jane was also very unhappy with her lower anterior teeth. They had been adjusted significantly during the fitting of the upper veneers; however they still didn’t look right—what you could actually see of them. Her occlusion was not taken into consideration when her upper veneers were placed, so her lower teeth were barely visible when she smiled.
Aesthetic concerns were not the only problems with Jane’s teeth; she was also experiencing severe pain. Since the veneers had been placed, the gingiva around the teeth (numbers 7 and 8) was constantly sore to the touch and bled easily. She also had chronic pain in the upper left quadrant. Her previous dentist had indicated that there were no problems in that area, but she continued to have pain. Obviously, something was wrong there.
Another concern for Jane (with dental work in general) was with impressions and X-rays. She had a severe gag reflex, which meant that the mere thought of having a physical impression of her teeth gave her extreme anxiety. She also had concerns about having X-rays done, since she had very large mandibular tori and therefore the process was very uncomfortable for her.
Above all, Jane just wanted her concerns heard and validated. She felt that all of her concerns with the previous dentist were disregarded or not addressed in a constructive manner. With the previous dentist, she had been in numerous times to get things resolved, but the problems persisted.
So, what was my job? How would I help Jane? My plan was to listen, examine, and go to work to correct the problems.
Our Assessment
After listening to Jane, I performed an initial exam. We took anterior peri-apicals, bitewings, and a panoramic X-ray, being very careful of Jane’s mandibular tori and gag reflex issues. The maxillary study model was taken with a lower impression tray and a very small amount of fast-setting impression material. We assured her that she would not need a further upper impression done. We would get all of the information we needed about her upper arch going forward by using an intraoral digital scanner. Thankfully, one of Jane’s concerns was easily resolved that day.
Once the X-rays, study models, and pre-op photos were taken, I reviewed the case. My examination confirmed that everything that had been bothering Jane was indeed accurate:
• Her veneers on her teeth (numbers 6 to 11) were poor fitting and unaesthetic. They were rather opaque and bulky.
• There were large cement margins, with some interproximal margins visible from the buccal when Jane smiled.
• The previous restorative dentist adjusted the veneers with diamond burs to decrease their thickness and bulk. The striations from the burs were still visible.
• Jane’s tissue surrounding tooth number 7 was very tender to the touch and erythematous. There was visible swelling of the papilla and the tissue bled easily and profusely on probing.
• The restorations on the teeth (numbers 7 and 8) were over-contoured, which contributed to food and plaque accumulation, causing a localized periodontitis with associated bone loss.
• There was a large carious lesion on the mesial of tooth number 15, which was the cause of Jane’s pain on the upper left, as well as a very sensitive occlusal surface of number 14(due to exposed dentin).
• Finally, X-ray examination revealed a perforation of the pulp chamber floor of tooth number 30 and that gutta percha was placed through the perforation (outside of the root) making the prognosis of this tooth (while currently asymptomatic) hopeless.
In the consultation appointment, I presented the clinical findings in specific detail and gave her my suggested treatment plan. This included the sequencing of treatment and timetable, cost of treatment, and what Jane could expect both during the treatment as well as the final outcome. When I consulted with Jane, I showed her multiple cosmetic cases that I had restored, with before-and-after photos, so she could get an idea of the value that I place on aesthetic outcomes.
My office staff created hardcover bound books that are filled with photos of our completed cases. We also have a book showing the positive results of our implant dentistry. We keep a copy of each of these books in our treatment rooms and consultation room, so we can easily refer to them with our patients. The saying, “A picture is worth a thousand words,” really is true! Patients can hear everything that you plan to do for them when you verbally describe it; however, until they actually see samples of your work, they won’t have a visual image of how great the treatment plan you propose will be!
I also explained to Jane how her health would benefit. I discussed that the first step in my plan would be to take care of her in-fected tooth and to restore her periodontium to optimal health. Then, when her pain was eliminated, we would proceed to the cosmetic aspects of her case.
After the consultation was finished and Jane had a chance to ask questions, she immediately told us her decision. She was 100 percent on board with treatment and wanted to start immediately.
Jane’s Treatment Plan
The sequence outlined for Jane’s treatment was as follows:
- Endodontic referral for treatment of tooth number 15, followed by a composite core build-up.
- Periodontal therapy in both the anterior region and upper left to achieve optimal tissue health.
- Wax up of maxillary and mandibular teeth with the plan to place all ceramic restorations on her teeth (4 to 15, and 22 to 27) including the construction of a Sil-Tech® PVS index of both the maxillary and mandibular wax ups to aid in the construction of provisional restorations and utilizing the general shape of LVI Smile Catalog, “Natural.”
- Preparation of maxillary teeth and placement of permanent restorations.
- Placement of dental implant by the periodontist followed by preparation of mandibular teeth and placement of permanent restorations.
- Restore the now fully-healed and osseointegrated implant in the position of tooth number 30.
 Step 1: Getting the Patient Comfortable by Resolving Pain Issues
In stage one, we referred Jane to Dr. Yean Young, an endodontist, in Quincy, MA, for a root canal on tooth number 15. Jane was having significant pain in that tooth, so I wanted to relieve that discomfort immediately. It was imperative to improve her comfort level before we proceeded any further with the treatment plan.
Once the endodontic work was done, I placed a composite core as an interim restoration. At the time, I chose to do a large composite core instead of a crown, or definitive restoration. We planned to restore this tooth as part of the overall maxillary restorative treatment plan. This composite core build-up would function for her until we were ready to do the cosmetic work. The area would also require some periodontal treatment prior to a final restoration being placed.
Step 2: Proper Framing
Jane had active infection around tooth number 7. Thereby, her gums were swollen and tender. In addition, in the upper left around tooth number 15, where the root canal was performed, the decay on the tooth impinged on the biologic width of the tooth (meaning there wasn’t enough room between where I would finish the restoration and where the gums were attached to her tooth). There was a need to reposition the gum on the mesial of number 15 so that a healthy periodontium could be established and maintained. I opted to refer Jane to a periodontist.
I referred Jane to Dr. Thomas Mone of Braintree, MA, and he was able to create a healthy gingival foundation for me to work with. He was able to give me enough tooth on the upper left, where the root canal was done, so that I could restore this tooth properly. Dr. Mone created a harmonious gingival contour so that when I replaced her veneers later in the restoration, the tissue and the contours that he formed on her gumline created a beautiful framework for her new teeth.
Having a proper gingival margin can be compared to putting a picture frame on a beautiful picture. You might have a beautiful picture, but if you don’t have an equally beautiful frame, the result isn’t going to look very impressive.
To create this ideal gum framework, Dr. Mone used LANAP® (laser-assisted periodontal therapy). This proved to be quite successful at restoring Jane’s periodontal health.
In addition, during the active phase of periodontal therapy, tooth number 30 was extracted and an osseous graft was performed.
Step 3: The Blueprint
After about four months of healing and tissue maturation following periodontal therapy, restorative care was commenced. Teeth (numbers 4 to 13) were prepared for porcelain veneers. I used Empress pressable ceramic restorations (Arrowhead Elite). Then, the teeth (numbers 14 and 15) were prepared for IPS e.max®
ceramic crowns. Impressions—in Jane’s case, digital scans—of the prepared teeth were completed with the Cadent iTero intraoral scanner.
As noted, Jane was greatly relieved to not endure traditional impressions due to her significant gag reflex. A facebow transfer was also taken at this visit to aid the laboratory (Arrowhead) in mounting the case on an Artex® semi-adjustable articulator. The teeth were provisionalized with Luxatemp (bleach shade), utilizing the Sil-Tech® matrix made on our diagnostic wax up.
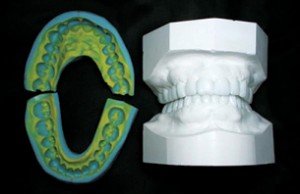 Doing a wax up is an extremely helpful part of a successful comprehensive case. It gives you a blueprint and allows you to know what the results will be, even before you start. When you know what the teeth are going to look like when you finish, you can reverse engineer and plan what you’re going to do as far as tooth reduction and preparation are concerned. If you don’t know where you’re going, then you can’t know how to prepare the teeth to get there.
By creating a Sil-Tech® PVS matrix, you can create a temporary or provisional restoration that mimics the shape and size of the permanent restorations. When you look at the temporary restorations in your patient’s mouth—and I typically do so a couple of days after they have been placed—you can make a better evaluation of how they look cosmetically and functionally in the person’s mouth. Because you are duplicating what you’ve done in the laboratory with a wax up, if you need to modify it, you easily can. And that’s because you, your patient, and your lab technician are all looking and talking about the same thing.
For example, if the patient returned to me and said, “Hey, Dr. Nankin, I’d like to have my front teeth a little shorter,” or “Dr. Nankin, I’d like the corner of this tooth to be a little more rounded,” I can do that for the patient. I can modify it on the temporaries and then take a new impression, photo, or scan and send it back to the lab. When the lab tech gets the change order, they can compare it to the wax up and know what changes need to be made on the permanent restorations.
In Jane’s case, she returned five days after placement of her provisional restorations to evaluate the shade, shape, and length of the restorations. As already mentioned, this was done to decrease any potential cosmetic issues prior to constructing and placing the final restorations. We discussed the possibility of slightly lengthening the lateral incisors and closing some embrasures between the lateral incisors and central incisors. We also decided on utilizing Ivoclar bleach shade 020, with custom shade characterization to improve on incisal translucency and surface texture of the final restorations. The shade of the preps was taken at the prep appointment.
During this visit, Jane reported temperature sensitivity on tooth number 7. During preparation, it was noted that the previous restoration was close to the pulp of the tooth. At that time, we decided that endodontic treatment should be performed prior to the final restorations being delivered.
Typically, the endodontist, Dr. Young, would have gone through the lingual of the tooth to access the root canal. However, in this case, she went through the incisal edge, or top of the tooth. In the procedure, she used a surgical microscope so she could make a very small opening in the area and then underfilled it with a small amount of composite. She made her access inside the margins of the prepared veneer.
By placing the access inside the margins of the prepared tooth, the root canal procedure didn’t delay the treatment plan. I didn’t have to re-prep the tooth. I didn’t have to take a new impression. I also didn’t end up with a composite restoration adjacent to my new veneer.
Step 4: Placing the Upper Veneers
Every case is unique and the steps of completion are slightly different. Essentially, the steps are driven by the patient’s needs. In Jane’s case, she was so unhappy with how her previous veneers looked on her upper teeth that we decided to take care of those first. They are more visible, and we really wanted to make those look better as soon as possible, to give Jane the excitement and assurance she needed that the treatment was proceeding productively. Hence, for those reasons, the upper veneers were placed during step four. On the other hand, Jane’s lower teeth were not as much of a “driving force” for Jane. Yes, she wanted them taken care of, but they were a second priority in comparison to the upper teeth. Hence, they were taken care of in step five.
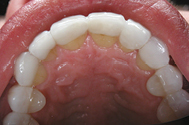 Final restorations for Jane’s teeth (numbers 6 to 11) were delivered in four weeks. The veneers were bonded into place utilizing Variolink dual cure composite cement. The molar crowns were bonded into place with Multilink after applying Telio® CS Desensitizer. Every dentist has his or her preference of bonding material and there is really no right or wrong way. I prefer to use the Variolink for the anterior teeth and the Multilink for the posteriors. I have found that they bond the best and deliver the best results.
Step 5: Placing the Implant and Working on the Lower Teeth
After completion of the maxillary restorations, Jane returned to the periodontist for placement of the dental implant in the site of number 30. A Biomet 3i Certain® implant (6 mm. x 11.5 mm) was placed. The implant is designed for a platform switch to a 5 mm restorative platform.
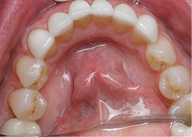 During the healing phase of the dental implant, we began the restoration of Jane’s lower anterior teeth. Her teeth (numbers 22 to 27) were prepared and like the maxilla teeth, scanned with the
Cadent iTero intraoral scanner. Provisionals were placed utilizing Luxatemp bleach shade. Again, Jane returned the following week to evaluate the shape, size, and shade of the provisionals. Jane reported no problems and the final restorations were constructed in Empress pressable ceramics (Arrowhead Elite). The veneers were bonded into place with Variolink dual cure composite cement.
Step 6: Placing the Implant
We completed the restoration of the dental implant during the last step of the process for Jane. As previously noted, her lower right molar had to be extracted and then the site received a bone graft in step two. We waited for that to heal before the implant could be placed at the beginning of step five. Then, once the implant was placed, we waited for that to heal. In the meantime, we did the cosmetic work on the lower anterior teeth during the remainder of step five.
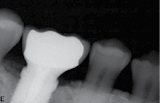 In step six, the final component of this case was to restore the fully-healed and osseointegrated implant in the position of tooth number 30. A BellaTek® (Encode®) healing abutment was placed into the dental implant. X-ray confirmation of the seating of this abutment was performed as well as confirming the tightness of the abutment screw. This allowed us to scan the BellaTek® abutment with the Cadent iTero scanner.
Digital design of a custom-milled titanium abutment was completed and manufactured at Biomet 3i (Palm Gardens, FL). The utilization of a custom-designed and milled abutment allowed for proper emergence profile and also let us place our restorative margins following soft tissue architecture. This is especially important when utilizing cemented restorations, as it helps prevent excess cement retention.
Jane returned four weeks later and the titanium abutment and crown were seated (confirmed by X-ray). The abutment was placed utilizing a gold abutment screw tightened to 20 NCm. Cotton and Cavit were placed into the abutment screw channel to allow future access, if necessary to this area.
An additional advantage of scanning a BellaTek® abutment with the iTero intraoral scanner is that you receive a die model (milled polyurethane) of the titanium abutment. When we cemented this crown, we first placed the crown with a minimum of adhesive cement over the die model, expressing out any excess cement. The crown was carried into the mouth and placed over the titanium abutment with only the very minimum of cement expressed out that needed to be removed.
Jane’s New Smile
I still remember how Jane responded the day we finished her restorations. She said, “They feel like they belong!” Today, months later, she still comments on how much she enjoys her new smile. Jane remarked that she feels healthier and like herself again. She loves the way her teeth look. She also loves that she is no longer in pain and that her gums don’t bleed at the slightest touch. She said that the comprehensive case we did improved her life and made her a much happier person. And we’re so glad we were able to do that for her! We listened, examined, and went to work. And the result is something that we are still proud of!

