

“Earning a T-Shirt” After a Full Mouth Reconstruction.
In 2014, I took the Full Arch Reconstruction course with the Dr. Dick Barnes Group at Arrowhead Dental Laboratory in Salt Lake City, UT. Following the course, I was eager to implement all the things I had learned. I did my first full mouth case on a friend of mine, and wrote about the experience in the November 2015 issue of Aesthetic Dentistry magazine. The case was straightforward and went smoothly.
After my second full mouth case, however, I learned that it is during the more complicated cases that dentists have to stretch beyond their comfort zones, and it is where they find opportunities for extra growth.
In his classes, Dr. Jim Downs talks about “getting that T-shirt.” The phrase refers to the difficulties and struggles common to the profession—financial issues, staffing disputes, or challenges incorporating new clinical skills. If you’ve “got that T-shirt,” it’s a metaphor that you know what it feels like to experience those struggles and hopefully, you’ve learned to overcome them. I “earned my T-shirt” in troubleshooting problems in full mouth reconstructions with my second full mouth case.
![]()
THE PATIENT
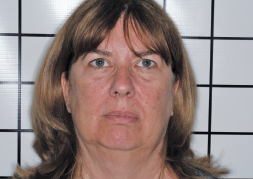
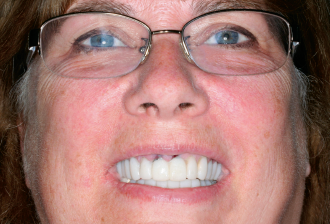
A few years ago, a 61-year-old patient came to my office. She and her husband had recently moved to Sun City, Arizona, (on the northwest side of Phoenix) from Juneau, Alaska, for the winter. The patient saw my office sign and decided it was time to get her bridge replaced with implants.
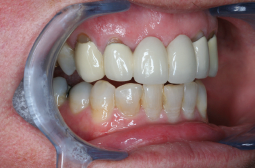
After conducting a comprehensive exam, I learned that she had knocked out tooth numbers 8 and 9 on a playground when she was young. She’d had a bridge done, from tooth numbers 6 to 11, a long time ago. She never really liked it but couldn’t explain why.
The patient said that she wanted me to place implants at tooth numbers 8 and 9, and place crowns on tooth numbers 6, 7, 10, and 11. After a comprehensive exam I realized that her bridge was made parallel to her occlusal plane, which was canted to her left, so she unknowingly tipped her head to compensate for the look. At that time, the dentist followed her occlusion and likely did what was the standard of care, and it had lasted more than 40 years.
In addition, the patient’s gums had receded and there was some marginal exposure and decay. She also had several precarious amalgams. I questioned the patient further and found that for many years she had experienced jaw pain, headaches, and neck pain, but she didn’t realize that those could be related to her occlusion.
The patient indicated that she felt pain when I palpated her masseter and temporalis muscles, as well as her upper neck muscles. She had mild popping of both temporal mandibular joints (TMJ). Her Shimbashi measurement (9:24 CEJ to CEJ measurement) was 14mm.
![]()

![]()
The patient explained that all she wanted was a bridge replaced, which for most dentists would be a good day, but I knew there were more layers to her health concerns, and I prepared a more comprehensive option for her.
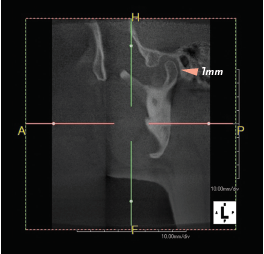
There are a handful of ways to determine physiologic occlusion, but the goal is always the same: determine the ideal maxilla-mandibular relationship. With her symptoms, I took a cone beam computed tomography (CBCT) to assess disk position at maximum intercuspation (MIP).
I am still learning just how critical TMJ is to occlusal repositioning. With the availability of cone beam imaging, it’s imperative to take one. Physiological theory of bite repositioning to eliminate specific symptoms focuses on jaw musculature and neutral TMJ. Therefore, I used a Lucia jig deprogrammer to reduce muscle memory, then a swallow bite to approximate neutral muscle positioning (opening her up about 3mm anteriorly) and took another CBCT. (Since the time of this case, I have also recently purchased a tens unit, which I now use to deprogram TMJ positioning.)
For this patient, I compared the pre-op joint to the swallow bite joint position. The condyles had rotated forward, giving 2mm more retro-discal space and less tension. Her new Shimbashi was 17mm.
The patient’s primary concern was replacing her bridge, but after gathering the data and demonstrating the relationship of her malocclusion to her pain, I was able to present a full mouth rehabilitation, including implants at tooth numbers 8 and 9. I could do the implants that she wanted, but I explained that even if we placed those, her bite plane would still be off.
Since we were doing work anyway, it was a great opportunity to restore everything at once. With a full mouth restoration, the patient would get the implants she wanted, plus she could improve her occlusion, eliminate bite-related pain symptoms, and have all new, beautiful teeth.
I explained the benefits of doing a complete restoration now, because she was still young and her dentition would only get worse without it. I showed her the Seven Slides, a case presentation tool from Dr. Dick Barnes that showcases the possibilities of comprehensive dentistry. After the slideshow all she said was, “When can we start?”
I told her it would take four visits to complete the work, judging from the one full mouth reconstruction case I had previously completed. Ultimately, in my haste to get started, I forgot to take one of the most important records—the stick bite. The treatment plan consisted of 28 crowns, two implants and abutments, and a nocturnal orthotic. I ordered a White Wax-up to the new bite position, which included Sil-Tech® temporary matrix, Wax-up bite registration, and reduction guides.
After I submitted the case to Arrowhead Dental Laboratory, the lab called to ask how the case would be mounted. They told me it looked crooked and asked if I wanted them to mount it to level, and I responded “yes.” We proceeded to move forward with treatment.
STARTING OUT
There were a few ways I could have approached the staging of her treatment, given the surgical component that required healing time. I could have placed the implants, used a temporary bridge until implant integration, and then prepped the full mouth.
The patient clearly communicated that she wanted to do all prep and surgery work in as few visits as possible due to dental anxiety. I decided to prep and place implants on the same visit, restore all but the anterior maxillary six to allow proper implant integration, and use a temporary bridge.
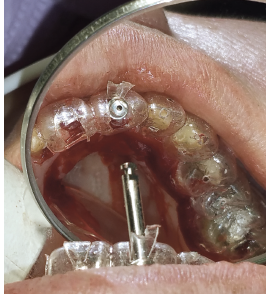
Prep day was long and exciting. I didn’t use a surgical guide for implant placement. Instead, I used the reduction guide and drilled through the guide for the osteotomy. The paralleling posts were dead on because of the guide that comes with the full mouth kit.
I knew where I wanted them, and the reduction guide showed me where the crowns would sit, so I placed the implant with the center through the cingulum, and I didn’t have to do any bone grafting, even with her recession. I used a CO2 laser to contour the gums for an ideal shape, both for placing the implants and seating the finals.
![]()
When staging treatment for the implant placement, I could have placed temps on the implants and splinted them, or I could have placed the implants months prior to placement to restore all at once. Instead of doing either of these methods, I placed Ankylos® C/X implants, which offer sulcus formers to “groom” the sulcus, lending to a more natural emergence profile of the final restoration. The patient had silver margins while in temps, so I told her not to smile too high for the duration of the healing.
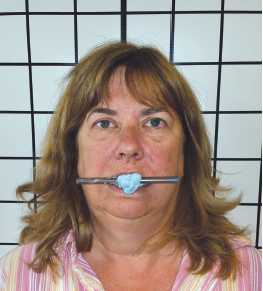
After placing the temps, however, I immediately noticed that her entire bite plane was off skeletally; it was obvious that her occlusal plane was canted to the left. I had incorporated so much dentistry into the preparation visit—two implants and 26 crown preps—that I missed doing a proper stick bite, and her bite was off. I couldn’t believe I neglected to take a stick bite for the dental lab.
HITTING A SPEED BUMP
With the temporaries, I was able to compensate for the cant by manually building them up chairside with composite. Fortunately, this workaround strategy was fine while the patient was in temps. I was glad we caught the problem before the lab made the permanent restorations.
However, I knew I couldn’t offer a solution for the patient if the permanent seatings were off, so I had to send the whole case back to the lab. This time I took a stick bite and took plenty of photos in front of the grid to ensure accuracy.
I put in the bite registration with Sil-Tech® from the prep guide and added the stick to it. Once that error was addressed and corrected, the case was predictable and proceeded smoothly.
With the adjustments and the healing time for the patient, the case took a bit longer than I had originally estimated. The patient was anxious to have her treatment completed and I explained that her case was more complicated than most, so we needed extra time.
![]()
![]()
The delay was ultimately a good thing. I had placed implants at tooth numbers 8 and 9, and the more time they had to heal, the better. By the time we did the permanent delivery, I decided to wait two more months to load the implants, I made a temporary bridge for the front six while seating the rest of the teeth permanently. Ultimately, the case turned out well.
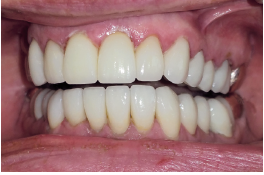
Immediately after seating the finals, the patient showed a little bit of white tissue at the margins due to the gingival sculpting with the laser. There was blanching when I seated everything; when I pushed on it, the tissue turned white because of restricted blood flow.
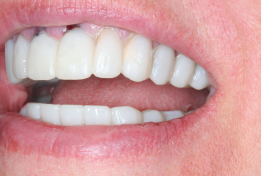
When I got the final case, everything fit perfectly and I didn’t need to adjust anything. I put the restorations in and checked the permanents with try-in paste so they would hold in place. I checked the bite with articulating paper, and everything looked ideal so I seated them.
Then I used the T-scan and had to make a minor adjustment: the initial bite was 48 to 52 percent left to right, which is almost dead on. I did a little polish on two teeth, and that brought it to 49.5 to 50.5.
For the terminal teeth, I placed gold restorations. She was a bruxer, but that wasn’t the only reason for them—it’s just good to give the teeth a “soft stop.” The gold is softer and wears nicely, which protects the ceramics. We were able to successfully open up her bite.
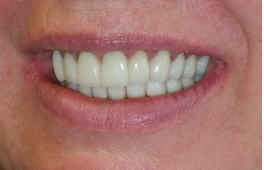
The patient was thrilled with the final results. With her dental treatment, we alleviated years of pain that she never thought would go away. Now, every time she comes in, she tells me that she sleeps better and wakes up with more energy. She also feels better about herself from a cosmetic standpoint.
LESSONS LEARNED
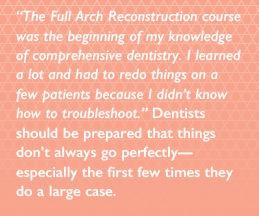
A while ago, I went to an Over the Shoulder™ course with the Dr. Dick Barnes Group. The instructor asked me to speak in front of the class of about 15 to 20 people. I said, “This class was the beginning of my knowledge of comprehensive dentistry. I learned a lot and had to redo things on a few patients because I didn’t know how to troubleshoot.”
![]()
Dentists should be prepared that things don’t always go perfectly—especially the first few times they do a large case. I highly recommend that dentists take the Hands-On courses, where they not only observe a case (such as in the Over the Shoulder™ class), but also get to work on a patient. Because of the experiential nature of the Hands-On class, dentists get to troubleshoot their own cases, as well as the cases of those in attendance.
I have taken the Hands-On class twice now, since the patient I brought to the original course initially wanted to do just her uppers and then decided she wanted to return to the class for her lower restorations. The nature of any clinical work is unpredictable and the more experience that a dentist can get, the better. I’ve done about 20 full mouth restoration cases now. My advice is to plan and learn everything you can.
![]()
![]()
For a full arch restoration, dentists may think they’re just putting crowns on teeth, but it’s a lot more than that: they’re creating a system. This system is time- and cost-intensive for dentists and patients, and everyone expects success.
In this case, I had anticipated that the patient’s work would be finished in three or four visits, but we had to do a few more than that. When something unexpected happens, it can snowball. The patient may get upset, which can shake a dentist’s confidence.
Even though this was a big and complicated case, I found out how easy it is to sell the treatment rather than present it. I was so excited to apply what I had learned that I found myself over-promising the timeline and mismanaging her expectations.
This case was admittedly more complicated than most, but fortunately the outcome was great. The patient has since told me that the results were even better than she had expected.
It’s easy to over-promise when presenting treatment, especially because dentists must exude confidence to get case acceptance. But once treatment has begun and payment has been made, any mistakes can cause discomfort and diminish the patient’s enthusiasm for and confidence in the quality of the care. Since today’s treatments are so incredible, all dentists should learn to balance confidence and excitement with a deep understanding of the procedures, planning for any and all contingencies, and preparing for the unexpected.


