

Advantages and Implementation of Intraoral Cameras.
For a lot of doctors, the most difficult thing to do is to convince a patient to accept treatment. If you show patients an X-ray, they usually do not proceed with treatment because they don’t know how to read it. X-rays cause confusion because patients don’t see or feel a problem. Therefore, convincing patients they need a crown can be a challenge.
About 30 years ago, Fuji Optical Systems introduced the first intraoral dental camera. It was called the Fuji DentaCam. When I saw it at a conference, I was enthralled! I knew immediately that I wanted one. The camera system was on a huge roller stand and had a Sony mavigraph printer (which printed only still shots—no videos), like a glorified Polaroid camera. It had strobe light optics and a large monitor. It was so heavy it had to be on wheels.
When I purchased this camera system in 1989, it cost me around $20,000. At the time, it was the biggest purchase of my life—other than my practice. I was the first dentist in Denver, CO, to have one, and I recouped the cost very quickly. We used the DentaCam for new patients and we called the printed images a “virtual tour of the mouth.” Patients were wowed by it!
The images created a real sense of urgency for the patient. When I showed them the photos, they could see what their teeth looked like, particularly under their old fillings. Patients would often ask, “How many of those old fillings do I still have in my mouth?” They wanted to know what they could do to take better care of their teeth. The early intraoral camera provided a way to document areas of concern in patients’ mouths. Their charts quickly filled up with photos.
IMPROVING TECHNOLOGY
I had the Fuji DentaCam for a while, but in retrospect, it was somewhat cumbersome and it eventually became difficult to get replacement parts for it. Also, it was so heavy that my team members disliked bringing it into the exam room.
Eventually, the age of computers took off and more options became available. In 1994 I moved into my current office and I had a lot of wiring installed to accommodate the new intraoral camera systems. Over time we added different types of plug-ins. Initially they used an S-video connection, but now it’s a USB or wireless connection.
To use the early models, I had to hold it far away or very close, and if I wanted it to be really close, I could dial in the focal length and it would become a macro lens. I had to hold the camera very still to capture a good image.
Carestream was the first company to develop an intraoral camera with auto-focus features. Auto-focus was a great advancement because I didn’t have to worry about the focal distance from the patient.
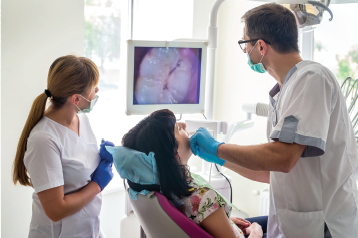
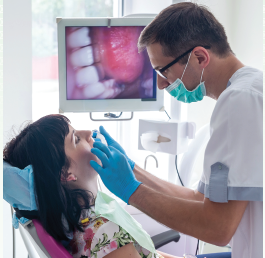
The most important advancement in intraoral cameras systems was the ability to capture and create videos. That changed everything! While still photos were great, seeing a live video feed of the mouth was even more compelling. With video, dentists could show the patient what their entire mouth and bite looked like. They could ask the patient to bite and show them exactly what was happening.
With today’s intraoral videos, patients are glued to the screen. At LêDowns Dentistry, we show our patients a video on a 40-inch television monitor. It’s impressive! Only a small minority of patients (about 2 percent) do not want to see the video because it looks too graphic to them. Most patients watch the video and say, “Wow! Your technology is incredible. I’ve never seen the back of my front teeth.”
With the video format, dentists can stop at any time and explain to their patients exactly what they are looking at. Plus, they can still print a photo or a screenshot. All of this helps patients become extremely involved in the process.
The imagery recorded by an intraoral camera is stored digitally. Our practice takes a lot of videos, which takes up a lot of memory. The videos have to be stored somewhere other than the chairside computer so the office computers aren’t slowed down. Our camera connects to a main office server as well as a cloud storage site for backup. Videos can be viewed on any computer in the office network at any time.
In our dental practice, we have two intraoral cameras at each location, for a total of four cameras. One camera is used in hygiene, and the other one is used in clinical. An intraoral camera, with its brilliant LED illumination, reduces the need for such things as an SLR camera, a ring flash, and a mirror.
Intraoral cameras are mounted on a small wand that is extremely light. They can travel from room to room with appropriate hook-ups. Make sure to purchase one that has a long cord—they are available as long as 15 feet. Our cameras are about five years old and have been in constant use.
USE IN PRACTICE
When a new patient visits our practice, we take bitewing X-rays and a 3D X-ray, check their periodontal status and dental health, and then take a virtual tour with the intraoral camera.
But it’s not just for new patients; we take intraoral video on current patients as well. If an existing patient comes in with an emergency, we pull out the camera. We take an X-ray, do a clinical exam, and then take photography with the video camera, all to find what is causing their pain.
Patients who watch a video don’t have to create an image of the problem in their minds because they can see it for themselves. Even if a patient isn’t yet experiencing pain, he or she can see the problem and take steps to fix it before it becomes painful and more expensive.
Since our practice became accustomed to using the intraoral camera regularly, we’ve had great success in helping our patients to accept treatment. On top of that, we get referrals. Often, the referrals say that their friends told them about a video we took of their mouths.
We charge a nominal fee for the intraoral images (around $20), and some insurance companies will pay for the photos. There is even a CDT code for intraoral photography—00220. But it only covers photographs, not video.

BENEFITS
Intraoral cameras offer multiple benefits for clinicians and their teams. If I were to start a new practice today, I would require four things: an intraoral camera, a 3D X-ray, electric handpieces, and a CO2 laser.
Here are some of the main benefits of intraoral cameras:
1. Return on investment (ROI). The ROI for an intraoral camera is quickly recouped—after maybe two or three patients. If the images help sell a full mouth rehab case, it pays for itself with only one patient.
2. Patient education. The intraoral camera helps us educate our patients so they can make better decisions about the care of their teeth. Also, it helps build trust between the patient and dentist because the patient can see what the dentist sees. The intraoral camera is likely one of the main reasons I have been doing a lot of larger cases.
3. Communication with the dental lab. Intraoral cameras have also been helpful in working with the dental lab. We can send video to the lab, and the technicians can zoom in and out to look at the shading, the translucency, and any other features we might want to include.
4. Insurance claim disputes. Soon after I purchased the Fuji DentaCam I received a call from a dental insurance company representative asking me how I got the photos of some teeth. He told me it would be great if I could take a “before” photo, and then a photo during treatment. In the treatment photo, he wanted to see what the tooth looked like after we took the filling out.
For the first time, I realized that I could give the insurance company an over-the-shoulder look at why we were doing the work that we did. It became a huge benefit in winning claims for our patients. If we sent in a photo X-ray narrative along with the claim, we won a high percentage of the cases.
Using the intraoral camera has helped me do more work and more complex cases, and has helped me to accomplish more on the cosmetic side of things rather than just traditional dentistry. Taking videos for insurance is now commonplace in our dental practice. These images help prove that we found fracture or decay, and that way it helps the front office on the insurance appeal process.
TRAINING THE TEAM
Dentists should include intraoral photos as part of every new patient exam. If I walk in to an operatory and I don’t see the camera, I ask my team if they did the virtual tour already, and if not, I make sure it gets done.
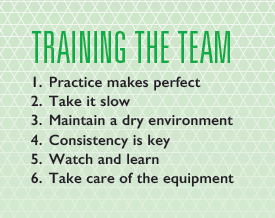
The doctor should set the expectation for the dental team that the intraoral camera be used on every new patient. I’ve learned a few ways to have success in implementing intraoral cameras at dental practices. Here are some of my suggestions:
1. Practice makes perfect. For dentists using the camera for the first time, there is a learning curve. It takes some practice to look at the screen and use the camera in the patient’s mouth simultaneously. Dentists have to train their brains so they know which direction to move. Hygienists and dental assistants need to practice as well so they get used to the process.
2. Take it slow. Train team members to move the camera slowly, especially during the learning phase. Otherwise, the video will look jittery and jumpy, like The Blair Witch Project. If the video is fast and jerky, there’s no way to show the patient anything and have them understand it.
3. Maintain a dry environment. Make sure the patient’s teeth are as dry as possible. Use a suction straw to remove any condensation in the patient’s mouth so their breath doesn’t fog up the camera.
4. Consistency is key. It is helpful to have a replicable system for using the camera. For example, start on the upper right, go all the way to the upper left, then drop down to the lower left and come back to the lower right. On average, the process should take about two minutes, depending on how severe the patient’s oral health is.
5. Watch and learn. At our practice, I ask team members to watch the learning videos from the vendor and then practice taking videos of each other. I mentor them and critique their videos so they know what I am looking for. When team members use intraoral cameras regularly, they become proficient quickly. With a solid week of practice, they should be quite skilled.
6. Take care of the equipment. Intraoral cameras have a limited lifespan, and it is important to properly care for the equipment to get the most out of your investment. Because team members take the camera from one room to another, the cord may deteriorate due to being bent. Team members should handle the cords carefully so that they last longer.
We put clear sleeves on our cameras—not only for universal precautions, but to make them easier to sterilize. Dentists should review with their team members how to clean the cameras, how to store them, and what precautions to take to avoid bending and crimping the cord (we hang ours up).
MAKE THE LEAP
Whenever you purchase a piece of equipment, the vendor typically offers an evaluation period where you can try it out (see story, “Making Smart Technology Decisions,” by Matthew Cook). During this trial period, ensure that the camera you buy is compatible with your computer system. Some of these require at least a 2.0 GHz processor and 1 GB of RAM, so you need to make sure your computers are up to date. Most intraoral cameras are PC-based, but some have Mac compatibility.
Once you have made the decision to buy an intraoral camera, just do it! The investment is going to pay off, both in terms of paying for the equipment, and in the sense of making you a better dentist. I’m so happy I was an early adopter of intraoral cameras. They’ve been a huge part of my practice ever since the days of the Fuji DentaCam.
The cost of investing in an intraoral camera has dropped considerably since the early cameras. Prices average about $4,000, which is far less than I paid for my first one. It’s worth it! If I had been able to offer video capture in my practice when I bought my first intraoral camera in 1989, I’d probably be retired by now.


