

A COMPREHENSIVE, FULL ARCH APPROACH.
When I met Jenny Kelley more than fourteen years ago, I knew she would be a great dental assistant. Years later, I asked her to join my team in Lawrence, KS. What I didn’t know was that in addition to being a great dental assistant, she would also be a patient of mine for a full mouth reconstruction. As part of the hiring terms, Jenny asked me to reconstruct her smile.
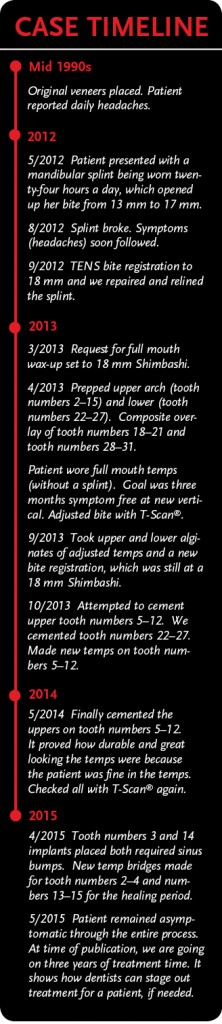
At the time, I learned that Jenny was suffering from years of debilitating headaches. Jenny had suffered from headaches since childhood. Over the years, Jenny reported that the headaches intensified, especially after she received her first set of veneers in the mid-1990s.
 The Correct Diagnosis
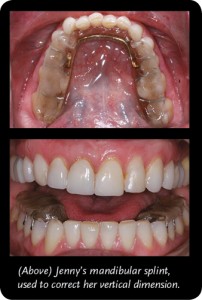
In 2001, Jenny worked for a general dentist in Las Vegas, NV, who specialized in neuromuscular dentistry. He conducted tests with the K7 neuromuscular jaw tracking system and determined that she had temporomandibular joint disorder (TMD) and a collapsed vertical dimension to her bite. Her records indicated a 13 mm Shimbashi and it needed to be closer to 17 mm. Jenny was fitted for a mandibular splint in order to get her jaw to the correct vertical dimension. The splint was adjusted several times to get it into the proper position. After wearing the splint for only a short time, her conditions (including her debilitating headaches) reportedly improved. She wore the splint continuously (day and night), for the next eleven years.
Joining My Team
In the summer of 2011, Jenny returned to Lawrence, KS, and because of our prior acquaintance, I recruited her for my dental team. At that time, I decided to shift the focus of my practice away from family practice to more comprehensive dentistry and surgical dental procedures. I needed an assistant who understood and valued that kind of dentistry as much as I did. Jenny was the perfect person for the job.
However, getting Jenny on board took a bit of persuasion. After some deliberation, Jenny accepted my offer and joined my team. But she did so on a conditional basis; Jenny wanted her full mouth restored using Arrowhead Elite dental restorations and she wanted me to be her dentist. Ultimately, she agreed to lead my restorative team and I agreed to the stipulations to fix her mouth. Both of us were very excited for the future!
The Root of the Problem
When Jenny had her original veneers placed (numbers 5–12) in the mid-1990s, the dentist did a fine job on the aesthetics with the materials available at the time. However, he didn’t take into consideration the vertical component of her occlusion. Because of that, her already tight bite became even tighter and, with the new veneers, she was firmly locked into a place that was not comfortable. As a result, Jenny’s headaches became even more severe after the procedure was completed.
Splint therapy worked wonders for Jenny. But the splint eventually needed to be replaced. In August 2012, the splint broke and Jenny’s headaches immediately returned. At that time, we decided to move forward with the full mouth procedure. Not only would Jenny’s smile be beautiful with the new restorations, but the functionality of her bite would be fully addressed and she would no longer need to wear a removable appliance.
Preliminary Treatment and Prepping
In September 2012, we conducted a TENS (transcutaneous electrical nerve stimulation) bite registration on Jenny. I used the ultra-low-frequency TENS device for 45 minutes to stimulate and fatigue (and thereby relax) Jenny’s jaw muscles. Once the jaw was relaxed, I took a bite registration. I used the swallow bite technique, placing wax over her first set of molars and then applied the TENS treatment again to “tap” in the bite until I arrived at the correct vertical (Shimbashi measurement) in the wax. I had set the goal of 18 mm as my target vertical dimension for Jenny’s case. I repaired and relined the splint at 18 mm. Jenny wore the splint for another five months to verify that her symptoms would not return at the new vertical dimension.
In March 2013, we completed the full mouth wax-up set at 18 mm Shimbashi. I choose 18 mm rather than the 17 mm from the neuromuscular K7 bite registration because it gave me up to 1 mm to adjust her bite and get everything balanced. However, as it turned out, Jenny was more comfortable more opened up, which does not always happen.
A wax-up is particularly important in full mouth cases because it allows us to achieve the ultimate in precision in the final product. Anything we plan to do to the patient’s mouth, we do to the wax-up first. This gives the patient an idea of what the final teeth will look like before we actually do the work.
 The following month, we began the restoration process by prepping her entire mouth, in one sitting. This procedure took about five hours and because of the length of time, I gave her a mild sedative to help keep her comfortable and relaxed. We prepped her upper arch teeth (numbers 2–15) and lower arch teeth (numbers 22–27) and then seated the temporaries. In addition, we added Snowcaps (temporary composite overlays) on her back molars and premolars (numbers 18–21 and numbers 28–31). The Snowcaps were important for Jenny’s procedure because they helped ensure that her vertical alignment stayed at 18 mm.
When you do a white wax-up with Arrowhead, they provide a Sil-Tech® matrix that allows you to quickly fabricate temporaries chairside that look and feel like the final restorations. This is a huge benefit because you can quickly identify any potential problems early, so they can be addressed before the final seating. The added benefit is that the patient sees what they are going to look like and experiences the enhancement before the final seating.
When Jenny looked at her new smile in the mirror that day, she literally broke down crying—sobbing actually—because of how beautiful the temporaries were and how happy she was to finally have a smile that allowed her to be pain free. Of course, her tears caused everyone else in the room to get emotional, too. It’s what every dentist hopes to accomplish for his or her patients—to make them so happy with their smile that they literally cry tears of joy. And for Jenny to react this way when only the temporaries were seated indicated how much she would like the permanent crowns.
A Year in Temps
We left Jenny’s temporaries on for nearly a year. This is much longer than normal for temporaries with an average patient. However, in Jenny’s case, we needed to make absolutely sure that her Shimbashi was correct and that she was 100 percent symptom free before we seated the permanents.
Jenny is an extremely sensitive patient and her Shimbashi had to be perfect, otherwise her symptoms would return. During the time that Jenny was wearing the temps, she slightly chipped one. Within twenty-four hours, her headaches returned.
Once we fixed the temp, though, the headaches immediately went away. Most patients will not notice something so drastic when a tooth chips, but patients as sensitive as Jenny definitely will.
 During the year that Jenny wore temporaries, we periodically checked her occlusion with a T-Scan® and made any necessary adjustments to her bite. A T-Scan® is particularly helpful in showing force as a function of time and if a dentist is still using the old-school, carbon paper method for checking occlusions in full mouth restorations, he or she should seriously consider upgrading. A digital scanner shows exactly what is going on with a patient’s occlusion; it shows which tooth hits first when the jaw closes; it shows the percentage of impact on the bite by the right molars versus the left molars, etc.
The T-Scan® data gave me the information I needed to adjust Jenny’s bite from right to left and front to back. Results from the T-Scan® were more accurate than the patient’s own perspective. Several times, Jenny insisted that a problem was with a tooth on the right, but the T-Scan® reported that the issue actually resulted from a deflection in another part of her mouth. Every time we adjusted according to the results of the T-Scan®, the symptoms abated.
Another reason that Jenny spent so long in temps was because we scheduled her appointments whenever we had time in the office. She wasn’t desperate to get out of the temps—she was happy with how they looked and felt. So we took our time and scheduled Jenny’s appointments in when we could throughout the year.
In October 2013, we seated her lower permanents (numbers 22–27) and in May 2014, we seated her upper permanents (numbers 5–12). Prior to both seatings, we checked her bite with the T-Scan® and verified the 18 mm Shimbashi.
Seating the Permanent Elite Restorations
When doing full mouth restorations, I recommend working with two assistants: one who works directly with the doctor and one who specifically handles the restorations. Before seating the crowns, my first job is to make a visual confirmation of the color of the final restorations to the temporaries. I do this, of course, when the temporaries are still in place.
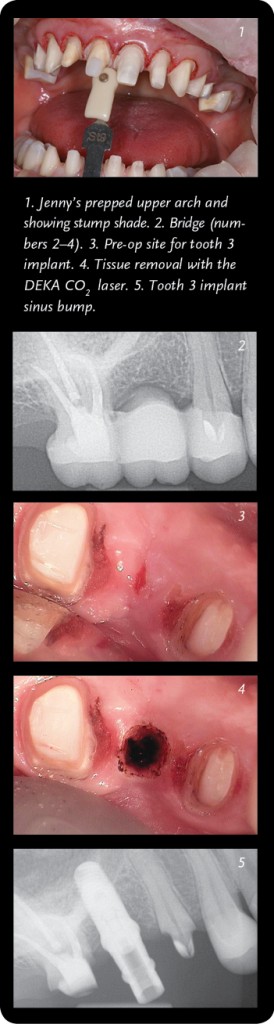
In Jenny’s case, we seated fourteen permanent teeth in two appointments (October 2013 and May 2014). The other teeth still needed some work, so we left the Snowcaps and other temps in place. Jenny had bridges (numbers 2–4 and numbers 13–15), since tooth number 3 and tooth number 14 were extracted years ago. The missing teeth caused bone loss in that area, so we needed to complete a sinus bump surgery before proceeding.
In April 2015, we removed the temps on tooth numbers 2, 4, 13, and 15. Then we completed both the sinus bump and implant placement on the same day. Jenny expressed no pain or soreness afterwards. She currently has a new temporary bridge in both areas while the sites heal. Once it does, we will place the permanent crowns on all remaining teeth later this year and give her back individual teeth again.
Jenny’s Treatment Plan
The cementation process can be challenging in a full arch case. For this reason, I approach the anterior and the posterior seg-ments using different strategies, which are outlined below.
Cementation Process:
- Visually confirmed the color of final restorations compared to temps, which are still in place.
- Applied anesthetic.
- Carefully sectioned the temps and removed.
- Cleaned the preps with peroxide to remove any debris or the “black smudge,” which is actually a Staphylococcus (“staph”) bacteria.
- Tried on all restorations starting with the centrals and working outward.
- Made adjustments to fit until all units seated freely.
- Posterior teeth were carefully cemented with SpeedCEM™. Anterior teeth were cemented with Variolink®.
Posterior Cementation Protocol:
Two assistants were available, which was a great advantage—one worked with the doctor, the other handled the restorations. I typically do teeth (numbers 2–4, 13–15, 18–21, and 28–31) as IPS e.max® Pressed restorations.
- Cleaned preps in the quadrant again with peroxide.
- Controlled any bleeding with Ultradent Astringedent®.
- Applied Telio® CS Desensitizer to all teeth we were cementing in the quadrant.
- Dry seated the most anterior tooth not being cemented at that time. a. Ex.: Cemented teeth (numbers 2–4) so we held tooth number 5 on the prep without any cement to control the contact point with tooth number 4.
- Applied Monobond Plus (silane) to the interior of all crowns being cemented. Allowed to set for 30 seconds and dry thinned with air.
- Applied SpeedCEM™ to the interior of the crowns.
- Used dry angles and cotton rolls to control moisture in the mouth around preps.
- Assistant handed crown full of cement to doctor for placement.
- Did the initial tack cure with curing light.
- Performed the initial cement clean-up and flossed interproximals.
- Did the final cure with DeOx® on the margins.
- Removed the “dry” crown on tooth number 5.
- Cleaned up final cement.
- Moved to the next posterior quadrant to repeat.
Anterior Cementation Protocol:
Cementation of teeth (numbers 5–12 and numbers 22–27).
The cementation process with the prepared teeth is different than the process for the “inside” of the final restorations. Here are the steps that I followed in this case for preps and restorations:
For the Preps (with chairside dental assistant):
- Doctor cleaned preps in the quadrant again with peroxide.
- Doctor controlled bleeding with Ultradent Astringedent®.
- Doctor used 35 percent Ultra-Etch® (blue) (an Ultradent product) on the teeth for 20 seconds and rinsed off.
- Doctor applied Telio® CS Desensitizer to all pertinent teeth.
- Doctor applied ExciTE®F with the VivaPen® (bonding agent) to the preps and air thinned. Did NOT light cure. (I turned the overhead light away and turned off the light that I had on my loopes).
- Chairside dental assistant handed me the final crowns full of cement. I started installing the central incisors and worked outward.
For the Restorations (with tabletop dental assistant):
- Tabletop dental assistant (D.A.) cleaned out the inside of all crowns with peroxide or Consepsis® and rinsed with water. D.A. ap-plied Monobond Plus (silane) to the interior of all crowns being cemented.
- Allowed to set for 30 seconds and dry thinned with air.
- D.A. applied ExciTE®F with the VivaPen® bonding agent to the inside of the crowns and margins and air thinned. (Do NOT light cure!) Placed in container out of light until needed.
- D.A. applied Variolink® Veneer cement +1 to the interior of the crowns and handed the crowns individually to the doctor, starting with the central incisors and working outward. The doctor used dry angles and cotton rolls to control moisture around preps. (I used the OptraGate™ instead of a rubber dam or cotton rolls because I had a cooperative patient who understood the pro-cess.) The OptraGate™ retracts the lips and doesn’t close off the throat, which freed up my left hand to hold the seated crowns and kept my right hand free to receive the new crowns.
- D. A. handed crowns to doctor for placement.
- D. A. did the initial tack cure with curing light, turning off the light at the doctor’s command.
- Doctor cleaned up initial cement. (I did not clean the contacts with floss at this point, because I didn’t want to start any bleeding until after the final cure.)
- Doctor did the final cure with DeOx® (eliminated the air-inhibited layer) on the margins.
- Doctor cleaned up the final cement.
- Doctor cleared all contacts with floss. Often, it’s not possible, so I use metal ProxiDiscs®.
- Doctor checked occlusion with T-Scan®.
- Doctor asked patient to return to clinic in 48 hours for a bite check. Checked with the T-Scan®.
- Completed case!
Moving Forward
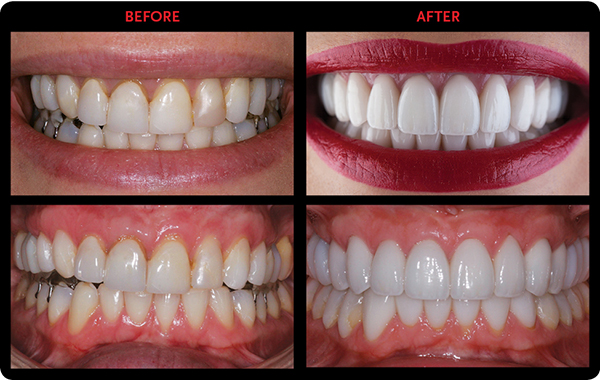
Not only does Jenny have a beautiful smile, she also enjoys a life free of pain. She has been asymptomatic through the entire process, which is nearly three years of treatment time. Jenny has not reported a single headache during that time, except for the brief moment when she chipped her temp. It truly is a miracle of modern dentistry.
I was so pleased to facilitate this transformation for Jenny because I know how much it has improved her life, and I know that she would never have done this for herself. Jenny is an integral part of my practice and a good friend, so it was an honor to do this type of dentistry for her. Being able to help someone escape a life of pain is always a personal victory as well as a professional one.
My advice for other dentists is simple: make sure you take care of the dental needs of the people on your team! If your employees are wearing your work, it sends a positive message to your patients; your team members become walking billboards for your practice. Jenny is my biggest advocate. She just has to flash her beautiful smile at the patients and tell them her story and they’re immediately on board for getting their own dentistry done. My practice has benefitedtremendously from Jenny’s experience with full mouth reconstruction and I’m positive it will continue to do so as long as she’s a part of my team.
To read Jenny Kelley’s full story, click on the following link: http://adentmag.com/finally-pain-free/


