

A new patient came to our office, Amesbury Dental Associates in Amesbury, MA, without a lot of complaints. She was extremely healthy—a runner who participates in 5K races and even marathons. The patient mentioned that she had spent the last several years taking care of the people around her more than focusing on herself. She had visited another dentist for several years until he retired, and she was looking for a new dentist.
SYMPTOMS OF OCCLUSAL ISSUES
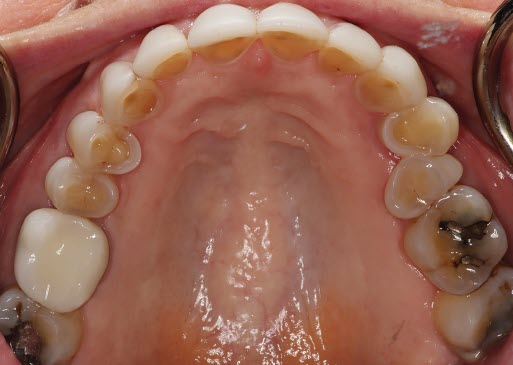
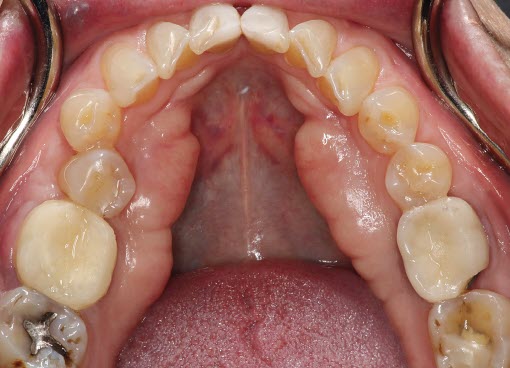
The patient originally visited us because she broke the crowns on tooth numbers 19 and 30. She takes good care of her teeth overall, so she wondered why the breakage was happening. None of her teeth had ever broken before, but she mentioned that she had a root canal on one of the broken crowns.
She takes really good care of her teeth, so she wondered why the breakage was happening.
Previously, she had some composite veneers placed, and since then she seemed to have more difficulty bringing her lower jaw into a comfortable position. The patient had worn those veneers for two years. She said that during that time, she felt like her front teeth were “hitting harder” than usual. But her foremost concern was her lower back teeth breaking down.
To understand the situation more clearly, I asked the patient a set of questions, including, “Do you feel like your lower jaw is being pushed back when you bite down?” And then I asked, “Do you feel like you have multiple bites?” She answered yes to both. From her answers, it became clear that she had an occlusal issue. The patient’s responses, her symptoms, and the clinical signs from a thorough exam led me to a diagnosis of anterior entrapment. After the exam, I did a diagnostic review to discuss her options for keeping her teeth for a lifetime.
The options included the optimal treatment of opening up her bite to give her lower jaw the freedom that it needed to function. The goal would be for her to eliminate her teeth continuously searching, clenching, and trying to push the jaw forward—resulting in a breakdown of the natural teeth. We talked about the jaw joint, the muscles, and the teeth, and how to get them all into harmony.
I noted that the previous dentist had added about 2 mm of tooth length in composite material with the veneers. Without that, the patient’s central incisor was 10.5 mm, an average length.
I put the patient in splint therapy for about two months to allow her jaw joint and muscles to settle into a comfortable position. If the jaw joint is not in the correct position and the muscles aren’t where they’re supposed to be, the bite will always be problematic.
THE IDEAL PLAN
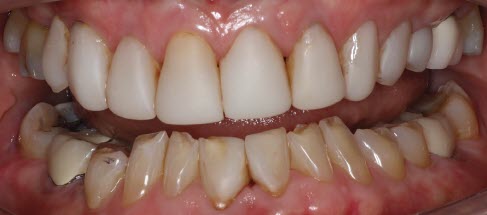
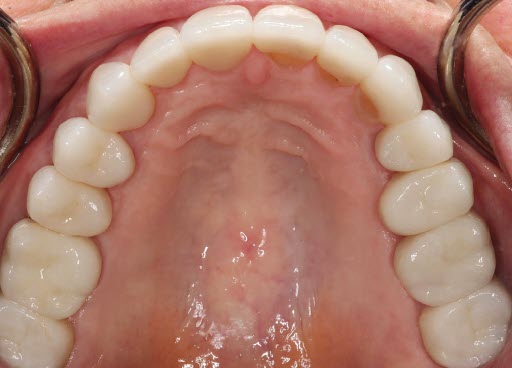
I presented the patient with a treatment plan for full mouth rehabilitation that included full upper and full lower porcelain and zirconia crowns. I initially gave her an “ideal” plan, as Dr. Jim Downs recommends in the Dr. Dick Barnes Group (DDBG) continuing education courses. In general, if a patient can’t commit to an ideal plan due to finances or other constraints, I offer a segmented plan. However, this patient was able to proceed with the ideal plan immediately.
The first thing I planned for was opening the patient to the correct bite measurement. Her Shimbashi (length of CEJ to CEJ) was 12 mm. I planned to open it to 17 mm because of a favorable crown-to-root ratio.
I was adding vertical dimension, so the old composites were removed from her natural teeth and all the temporary restorations were able to be added without any tooth preparation. Temps over unprepped teeth were a great way for the patient to view her new smile before getting started. They were also used as a preparation guide.
THE FIRST FOUR APPOINTMENTS
During the first appointment, I prepped tooth numbers 4 through 13, we kept the molars in her overlayed provisionals for posterior stops, and then I re-temporized the front ten teeth. She returned a week later for the second appointment, during which I prepped tooth numbers 2, 3, 14, and 15 and took a final impression.
The upper arch took two appointments to prep, and during a third appointment I delivered the upper restorations. For the fourth appointment, I did the same process on the lowers: I prepped tooth numbers 20 to 29 and left the molars in the overlayed provisionals. When the patient returned to the office, I prepped tooth numbers 18, 19, 30, and 31, took an impression of everything, and re-temporized the entire arch.
Splitting up preparation appointments into multiple visits is a great way to help the patient if they are unable to sit in the chair for long periods of time. This patient preferred this method of treatment. We spent about three hours during each appointment. Asking some patients to stay in the chair for longer than that can be too difficult.
It is important to spend time making perfect provisionals, not only for tissue healing and the protection of the teeth, but also to provide the patient with a visible change from their original smile to the new one. Dentists can also use provisionals as a “test-drive” for functionality and aesthetics.
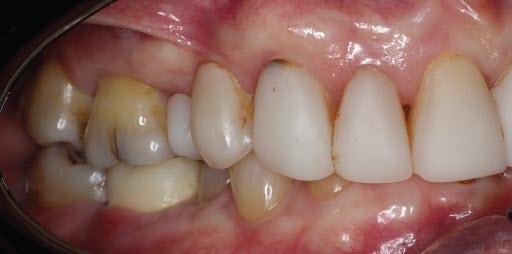
This patient stayed in her provisionals while Arrowhead Dental Laboratory in Sandy, UT, worked to get the final restorations done perfectly. Some colleagues wondered if the patient had orthodontics for this case, because some of the premolars were lingually inclined in comparison to the rest of her arch. The technicians at Arrowhead did a wonderful job of building out the crowns in zirconia and matching them with Elite e.max®.
Dentists can use provisionals as a “test-drive” for functionality and aesthetics.
For complex cases, it’s important to use a lab like Arrowhead. A great lab should not only have incredible ceramists, but they should also understand the pros and cons of different materials and have an expert knowledge of aesthetics and occlusion. This helps the lab provide beautiful, natural, and most importantly, properly functioning restorations.
SEATING THE FINALS
I seated the finals for the upper arch on one day and the lower arch on another day. I kept the patient in her temporaries on the lowers without prepping. I didn’t want the lab to build the uppers to her natural teeth; I wanted them to build them to the dimensions of the finals of her new lower teeth. So I put all of the temporaries on the bottom, then I took a scan of her lower arch with the temporaries on, and I took another scan with her final restorations on the top.
lateral.
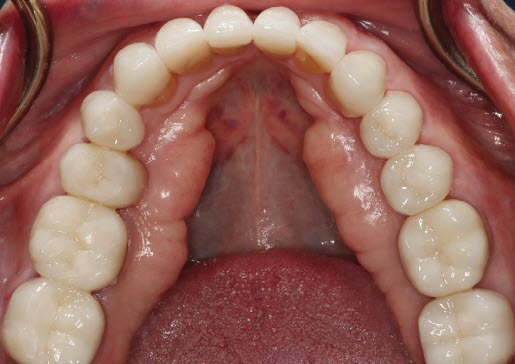
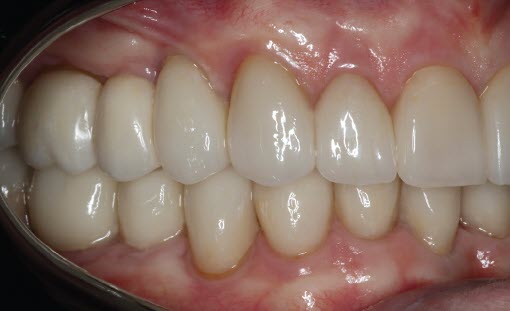
Once the occlusion was idealized with the lower overlayed provisionals, the patient returned to the practice, I took the temporaries off, prepped the lower arch, took an impression, and sent that information to the lab. With that information, the lab built the lower final restorations to the dimensions of the upper arch.
As mentioned previously, this case involved a large increase in vertical dimension. Therefore, the case was all additive, and there were many areas I did not have to prep because there was enough space for the restorative material. With the overlaid provisionals and Arrowhead’s reduction guide, I was able to see exactly which area of each tooth needed to be reduced and by how much. A reduction guide is such a valuable tool.

A LITTLE HELP FROM FRIENDS
The dental lab was extremely involved in this case, especially Arrowhead’s Technical Support Department. I always discuss my full mouth cases with technical reps, and they provide invaluable feedback on material choices and on how I can provide data to the technicians to help the case proceed smoothly. I’ve found that if I provide Arrowhead with quality information, they always exceed my expectations.
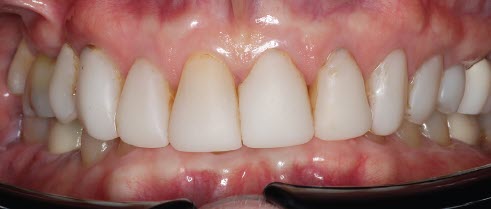
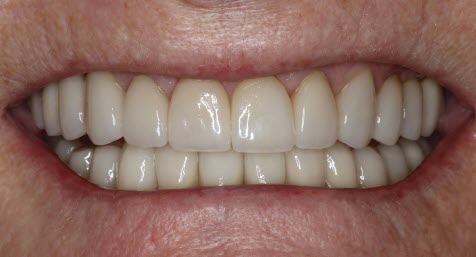
After the final restorations were placed, the patient was beyond grateful for everything. She’s my biggest advocate now! In the after photos, her facial shape seemed to change. If you look closely, you can see that her muscles of mastication relaxed, and she looks less tense.
With the knowledge provided by the Dr. Dick Barnes Group, the amazing lab technicians, and a great support team, dentists can provide an outstanding service to their patients. Not only is my patient happy with the aesthetics of this case, but she is functioning better than ever.


