

Step-by-Step Planning Leads to Successful Results.
Today’s patients are more educated than ever before. With easy access to the Internet and social media, public awareness about cosmetic dental procedures has grown. This increased knowledge often translates into greater demands for aesthetic restorative treatments from dentists.
Unfortunately, some dentists shy away from aesthetic restorative treatments due to a fear of large-case dentistry, or for any number of reasons. The increased demand for aesthetic restorative treatments can be challenging for dentists, lab technicians, and dental manufacturers alike.
But dentists need not fear. With digital planning, quality materials, and effective techniques, restorative teams can deliver life-changing dentistry. A step-by-step approach to planning, preparation, and material selection delivers predictability to large-case dentistry, and patients will receive the results they desire.
Case Presentation
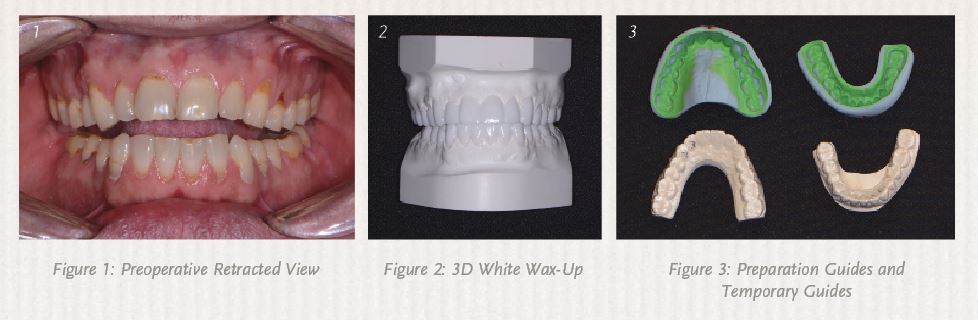
A patient I recently worked with provides a good case study for this approach. A dental provider referred a man in his late thirties to my practice because he was dissatisfied with the appearance of his smile—the patient felt that his existing teeth and restorations were unattractive because of recurrent decay, wear, and discoloration (see Figure 1, below). More importantly, he reported suffering from headaches, bruxing, and a limited range of function.
At the first appointment, the diagnostic evaluation consisted of a series of digital images with study casts, a centric relation bite record, a facebow transfer, and a full mouth set of X-rays. From these diagnostic tools, I learned that the patient had several teeth with worn composite restorations, as well as abfractions with cervical decay in the maxillary arch. Tooth number 5 had an existing crown on an implant.
In the lower arch, several existing composite restorations showed wear, and there was decay on the facial cervical areas. Although no restorations were present in the anterior mandibular teeth, there was severe wear in the incisal edges due to possible grinding, parafunction, and end-to-end bite.
Planning
Based on the clinical findings, as well as the mounted models, I diagnosed the patient with a restricted envelope of function and decreased vertical dimension from continuous wear. I used a diagnostic 3D White Wax-Up from Arrowhead Dental Laboratory to develop a treatment plan and determine if the vertical dimension could be increased (see Figure 2, below). With this service, dental providers also receive a preparation guide and a temporization fabrication template (see Figure 3, below).
After examining the White Wax-Up, I concluded that the vertical dimension could be increased by 1.5 mm. After the initial consult and digital images, I determined that lengthening the maxillary centrals by 1.3 mm would improve aesthetics. I also lengthened the canines to restore canine guidance in lateral excursions. With regard to the patient’s lower anterior teeth, the goal was to correct the length-to-width ratio and create a less worn appearance.
After gathering information from the diagnostic wax-up, I determined that restoring the entire dentition would enhance aesthetics and function. Tooth number 31 was already missing and tooth number 2 already had a root canal, core, and crown restoration. I decided not to remove this restoration since it did not oppose a lower tooth and was not visible when the patient smiled.

The treatment plan included crown restorations and involved placing composite cores where needed on teeth numbers 3 to 15 in the upper arch, and on teeth numbers 18 to 30 in the lower arch. For the crown restorations, I selected Arrowhead Dental Laboratory’s ZirCrown™, which is fabricated using Zenostar® (Ivoclar Vivadent). According to the manufacturer, the translucent zirconia material of Zenostar® combines excellent flexural strength with the aesthetics of natural tooth shades. Zenostar® is suitable for making monolithic restorations, but can also be used as an aesthetic framework material.
With full contour Zenostar® restorations, there are two methods to choose from in order to achieve the desired shade: the Zenostar® brush infiltration technique or the Zenostar® staining technique. Six pre-shaded zirconia blanks—pure, light, medium, intense, sun, and sun chroma—form the basis for reproducing the patient’s natural dentition. Due to their warm, reddish nuance, Zenostar® Zr Translucent sun and sun chroma are suitable for restorations with individual color characterization, and can be used for patients whose natural dentition deviates from classic tooth shades.
Additional benefits include the following:
- Full contour zirconia crowns and bridges without a ceramic veneer
- No chipping
- Cost effective and aesthetic metal-free restorations
- Biocompatible and durable material
- Suitability for cases where occlusal space is limited
- Pre-shaded zirconia for staining and glazing
Preparation
After informed consent was obtained from the patient, we initiated treatment with the following steps:
- Following consent, we administered anesthetic.
- Existing crown restorations were removed and the teeth cored with composite (where old amalgam cores were present or any indication of recurrent decay in the tooth) using a Midwest® Multiprep™ Carbide Bur (Dentsply).
- Adhese® Universal bonding agent (Ivoclar Vivadent) was applied following the manufacturer’s protocol and cured using the Demi™ Ultra (Kerr Dental) curing light.
- Using MultiCore® Flow light (Ivoclar Vivadent), build-ups were accomplished on any teeth requiring cores.
- A clear reduction guide (Arrowhead Dental Laboratory) provided with the 3D White Wax-Up was used to ensure adequate reduction for the definitive restorations. The clear reduction guide allows the dentist to work quickly and comfortably, and to know exactly how much to prepare each tooth for the best result.
- Using a coarse grit chamfer diamond bur 856 (Axis), the entire dentition was prepared for Zenostar® crowns starting from teeth numbers 3 to 15, and then teeth numbers 18 to 30. Once these teeth were prepared, I obtained a sequential bite using Blu-Mousse® VPS (Parkell) bite registration material.
- I selected a stump shade (Ivoclar Vivadent) matching the preparations to help the laboratory technician create natural-looking restorations.
- Utilizing Expasyl™ (Kerr), we controlled hemorrhaging, and also achieved gingival retraction. After approximately two minutes in the sulcus, the Expasyl™ was rinsed off thoroughly with copious amounts of water.
- A full arch impression was taken using Instant Custom C&B Trays (Good Fit®). Made of a proprietary material (polymethyl methacrylate—PMMA) that becomes adjustable when heated in boiling water, these trays provide a quick, efficient way of capturing a dimensionally accurate impression with uniform thickness of impression material.
- Once molded and customized to the patient’s maxilla and mandible, full arch impressions were taken using a heavy and light polyvinyl siloxane impression material (Take 1® Advanced™, Kerr).
- After the impressions were completed, a bite relations jig fabricated on the 3D White Wax-Up model was tried in the mouth.
- I placed light body impression material (Take 1® Advanced™, Kerr) into the relations jig and seated it in on the prepared teeth (see Figure 4, below). I asked the patient to bite into the relations jig until he reached the vertical stops. With the patient gently biting on the vertical stop, the material was allowed to set.
- Instructions for the size, shape, and color of the final restorations were forwarded to the dental laboratory (Arrowhead Dental Laboratory), as well as the 3D White Wax-Up models.

Provisionalization
A provisional restoration, which would aid in determining the best size, shape, color, and position for the definitive restorations, was made from a Sil-Tech (Ivoclar Vivadent) impression of the 3D White Wax-Up. I quickly filled the Sil-Tech mold using a B1 shade of Structur 3 (VOCO America) temporary material, and then placed it on the patient’s prepared dentition. Within minutes, I fabricated and effortlessly trimmed the provisionals with trimming burs and discs (Axis).
Once the teeth were desensitized with Systemp.desensitizer (Ivoclar Vivadent) and dried, I temporarily cemented the provisionals using TempBond™ Clear (Kerr). The patient was instructed about caring for the provisionals and using them in eating, speaking, and biting.
A few weeks later, the patient returned for evaluation of aesthetics, phonetics, and bite. He was excited about his provisional restorations, commenting that all his coworkers noticed that he looked younger and happier. He also reported that he no longer experienced discomfort in his TMJ and that his bite felt great. I instructed the dental lab to replicate the 3D White Wax-Up when fabricating the final restorations, as I made no adjustments or modifications to the temporaries.
Laboratory Considerations
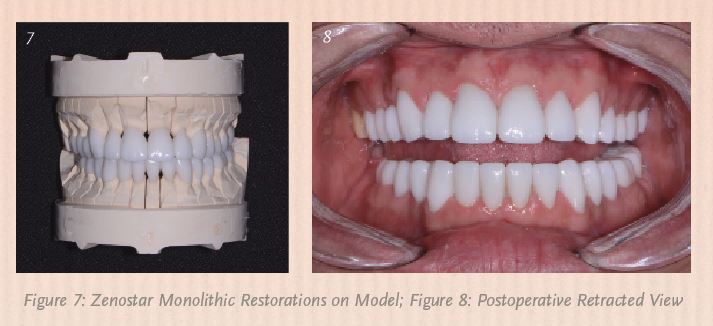
The 3D White Wax-Ups, color photographs, impressions, and bite relations were forwarded to the dental lab (Arrowhead Dental Laboratory). A scan of the 3D White Wax-Ups was used to select an appropriate arch form, tooth size, and occlusion from the library of teeth available in the 3Shape software (see Figures 5 & 6, above). Using 3Shape Communicate™, images of the proposed reconstruction were forwarded to my office by email. Any minor adjustments in tooth shape and contour were communicated to the technical advisor to achieve the ideal aesthetics. Once I received approval, the milling process began (see Figure 7, below).
Cementation
The patient returned three weeks after the postoperative appointment for removal of his provisionals and placement of the definitive restorations. Once appropriately anesthetized, I removed the provisional restorations with the Easy Pneumatic Crown and Bridge Remover (Dent Corp Research & Development). Any remaining temporary cement was removed and the teeth further cleaned with a 2% chlorhexidine gluconate solution (Consepsis® Ultradent Products, Inc.). The Zenostar® (Ivoclar Vivadent) crown restorations were tried in to verify marginal fit, contour, and accuracy. The patient examined the appearance of these restorations with a hand mirror. Once satisfied, he approved them for final cementation.
After the restorations were removed from the patient’s mouth, they were cleaned with Ivoclean (Ivoclar Vivadent), a universal cleaning paste indicated for cleaning of prosthetic restoration surfaces that have been contaminated during intraoral try-in. The active ingredient is sodium hydroxide, which is for extraoral use only.
Once shaken, the material was applied to the restorations and then thoroughly rinsed. Cleaning the restorations in this way prior to final installation enhances the bond strength between the indirect restoration and adhesive cement.
After the preparations were washed and dried, I applied Adhese® Universal (Ivoclar Vivadent) (a single-component, light-cured adhesive) to the teeth using the VivaPen® (Ivoclar Vivadent) dispenser. Adhese® Universal (Ivoclar Vivadent) was used with the self-etch technique. I was careful to ensure there was no pooling of the adhesive before curing it for 10 seconds with the curing light.
I seated the crown restorations utilizing Variolink® Esthetic DC (Ivoclar Vivadent), a neutral shade of dual-curing adhesive resin cement. To prevent any canting of the restorations, I started from the midline and worked my way out distally. The restorations were secured until final polymerization was achieved. According to the manufacturer, some of the advantages of this cement are excellent shade stability, lifelike fluorescence, easy clean-up, and increased radiopacity.
The occlusion was checked and verified with the T-Scan® (Tekscan®) to make sure that the proper points of contact were in their ideal positions. The patient no longer experienced any pain and was pleased with his new smile (see Figure 8, above).
Conclusion
Dental providers can address the patient’s needs more effectively when they have a systematic method for treatment planning, material selection, tooth preparation, and cementation. Because of this, the outcome will be more predictable aesthetically and functionally.


