
Providing In-House Solutions for Edentulous Patients.
Taking an edentulous patient from start to finish in fewer dental appointments allows dentists to position themselves as providers who can fulfill their patients’ surgical and restorative needs. With the proper training, dental providers can provide extraction, grafting, and implant placement during one appointment at one location. This allows dentists to reduce the number of visits for the patient and helps minimize the patient’s cost, since he or she is not required to visit multiple dental providers.
Additionally (and most importantly), dental providers who offer full-service care have full control of a patient’s surgical and prosthetic outcome. Depending on a patient’s desires, the clinical conditions of the oral environment present, and the skills of the dental provider, a dentist may choose to extract teeth, level bone, and graft with guided dental implant placement—all within his or her dental practice.
A Comprehensive Case
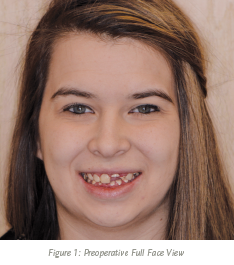
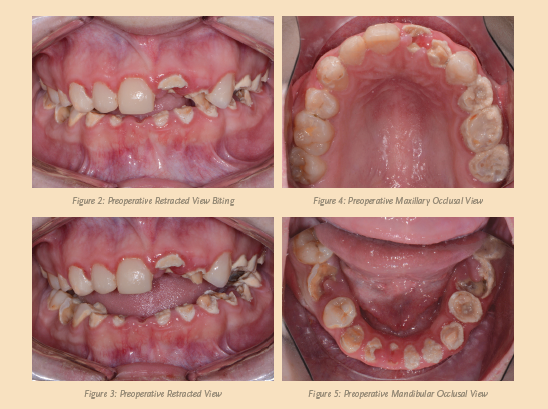
A female patient visited my practice for a consultation and desired to restore her smile (see Figure 1, above). She complained of generalized discomfort in her entire dentition, probably due to the rampant caries and infection that were present (see Figures 2, 3, 4, and 5, below).
Having already visited multiple providers for an evaluation, the patient was frustrated with the conflicting treatment options. The suggested treatments required multiple surgical and restorative visits that would take a long time to complete, or the dental treatment required a team approach in which little coordination by dentist and specialist was communicated to the patient.
Since neither option appealed to her, the patient asked me to provide comprehensive treatment that would include tooth extractions, bone leveling, grafting, dental implant placement, immediate provisionalization, and prosthetic rehabilitation—all within my own practice.
When presenting cases such as this to my patients, I always use the Dine Digital Solution camera (Lester Dine). Not only is this camera small, light, and waterproof, it also is very effective at taking clear close-up photographs, as well as full face shots. Additionally, I always offer my patients a third-party payment option like the Lending Club (San Francisco, CA) for their treatment. Lending Club Patient Solutions provides patients with great funding flexibility, low interest rates, and high approvals. The support from the Lending Club staff has also been welcome and professional.
Treatment Planning
A cone-beam computed tomography (CBCT) scan 8100 3D (Carestream Dental) was taken to accurately treatment plan this case to make certain that no complications would arise from doing all the procedures (tooth extraction, grafting, and implant placement) within one visit. Since the patient’s entire dentition had rampant caries, the treatment required extracting teeth (numbers 2 to 15 and 18 to 31), as well as the impacted third molars (tooth numbers 1, 16, 17, and 32) to avoid any additional complications in the future.
To further develop a treatment plan, I forwarded diagnostic models to the dental lab and mounted them on an articulator for further analysis and to meet the patient’s aesthetic and functional needs. Instructions for a virtual wax-up were prescribed for increasing the patient’s vertical dimension due to a collapse in her bite from the severe wear in her dentition.
As a result of the information gathered from merging the cone-beam computed tomography information with the STL files from the virtual wax-up, I determined that aesthetics and function could be enhanced by restoring the patient’s entire maxillary and mandibular arches with implant-supported restorations. While with the patient, I reviewed all of the risks, benefits, and alternatives of the various treatment options including dentures, overdentures, and fixed restorations. The patient chose a treatment plan that consisted of screw-retained, fixed zirconia restorations in the upper and lower arches, supported by six implants.
I utilized the ET III SA (Hiossen) implant system for this particular case because of the combination of their corkscrew thread, built-in platform switching, and apical design. According to the manufacturer, the enhanced SA (sandblasted and acid etched) surface of this implant has shown a substantial quickening of gene expression, cell differentiation, and proliferation that are essential to osseointegration (meaning faster bone healing and earlier loading times).
Other dental implant systems on the market with high initial stability include, but are not limited to: Engage™ (OCO Biomedical), NobelActive (Nobel Biocare), Seven (MIS), I5 (AB Dental USA), Conus 12 (BlueSkyBio), and AnyRidge (Megagen).
I selected the type and size of the implant because of cone-beam computed tomography planning, its relationship to the planned restoration, and its proximity to vital structures that were determined before performing the surgery.
I planned for guided bone leveling as well as immediate implant placement at the surgical appointment by using CT-based bone leveling and implant drilling guides. Additionally, prefabricated, screw-retained, fixed provisional restorations would be directly picked up with acrylic over dental implants in the maxilla and mandible in the key implant positions, if adequate fixation was acquired.
When performing so many procedures in one visit, I utilize IV sedation to make the procedure more efficient and comfortable for the patient as well as myself. Since the patient was sedated, a LogiBloc® (Common Sense Dental) mouth prop was used to keep her mouth open. LogiBloc’s unique design stabilized and comfortably supported the patient’s jaw while allowing unrestricted visual and physical access to the working area for the provider.
The Procedure
Once the patient was completely sedated and anesthetized, I extracted her teeth in a systematic manner, working in small sections at a time, starting from the anterior maxillary teeth. I used the Physics Forceps (Golden Dental Solutions) like a modified class 1 lever to atraumatically extract the teeth, with the goal of trying not to disturb the underlying bone. The beak of the forceps was placed on the lingual cervical portion of each tooth, while the soft bumper portion was placed on the buccal alveolar ridge at the approximate location of the muco-gingival junction.
During the extraction process, the beak grasps the tooth and the bumper acts as the fulcrum. I accomplished the extractions with only slight wrist action in a buccal direction, taking about 40 to 60 seconds for each extraction, depending on the tooth morphology and density of bone.
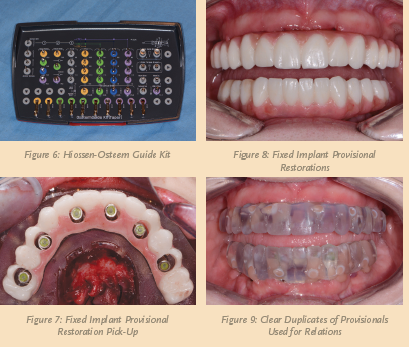
Once all the maxillary teeth were extracted, the alveolar crest was leveled 2 to 3 mm apically, following the parameters set by the bone leveling guide with the AEU7000 surgical motor/handpiece (Aseptico) so that the patient’s transition line from the ridge to the prosthesis would not be visible when the patient smiled. Once completed, I inserted the surgical drilling guide and the sites for the implants were initiated with the Hiossen-Osstem Guide Kit (see Figure 6, below).
In the upper arch, six 4.0 mm diameter ET III SA dental implants were placed in the areas of teeth (numbers 4, 6, 8, 9, 11, and 13) to support an All-On-Six restoration. I angled the most distal implants in order to avoid the maxillary sinus cavities and any augmentation in that area.
In the lower arch, I used several different widths (3.5, 4.5, and 5.0 mm) of the
ET III SA dental implants due to various widths of bone available in the remaining ridge. There, the tooth areas that would have dental implant placement included tooth numbers 19, 22, 23, 25, 27, and 30.
A baseline implant stability quotient (ISQ) reading of the implants was taken utilizing the Osstell® ISQ unit (Henry Schein®). Since the initial readings were all above 65 and the quality of bone after leveling was good, temporary cylinders (Hiossen) were placed on the multi-unit abutments (Hiossen) for immediate provisionalization.
Any residual areas around the implants or in the sockets were grafted with a putty blend of cortical mineralized and demineralized bone grafting material to optimize the area for regeneration. I achieved primary closure by suturing the tissue with resorbable sutures.
To ensure a passive fit over the temporary abutments (see Figure 7, above), I tried in the immediate provisional restoration. Once confirmed, block out material was placed to prevent the restoration from locking on, and chairside hard reline material (Rebase II, Tokuyama®) was placed within recesses around the temporary abutments to pick up the restoration.
After the material completely set, the immediate provisional restoration was removed and any access material was trimmed and polished with the Torque Plus (Aseptico) lab handpiece and acrylic bur (Komet). I utilized a similar series of steps for the mandibular arch. The ISQ values were even higher, due to the type and quality of bone present in the patient’s mandible.
Next, I took a panorex to confirm the placement and position of the dental implants with their corresponding multi-unit abutments and temporary cylinders.
Seven days postoperatively, the patient returned with very little discomfort, swelling, or bruising. She was very pleased with her fixed provisional restorations (see Figure 8, above). Now that the patient was no longer anesthetized, I checked the occlusion again to confirm that there were no interferences in lateral and protrusive movements. The next step in her treatment consisted of impressions for the definitive upper and lower restorations approximately four to five months postoperatively.
Approximately 16 weeks after implant placement, the patient returned for the prosthetic phase of her treatment. The gingival tissue around the implants looked pink and healthy. Each implant was tested with the Osstell® ISQ implant stability meter. Since the ISQ readings were all very high (above 75), impression posts (Hiossen) were inserted on the multi-unit abutments.
Since all the dental implants were well integrated, impressions were taken for the definitive restorations. For both arches, impressions were taken using Instant Custom Trays for crown & bridge (Good Fit®) with a heavy and light body polyvinyl siloxane (PVS) impression material (Take 1® Advanced™, Kerr).
I accomplished bite relations by picking up clear duplicates of the provisional restorations (see Figure 9, above). Instructions for size, shape, and color for the definitive restorations were forwarded to the dental laboratory and any changes indicated were communicated to the dental laboratory technician.
An FP3 prosthesis was fabricated for the patient’s upper and lower restorations. The pink gingival areas of this prosthesis type were needed to reconstitute the maxillary and mandibular tissue contours, as substantial bone leveling was required to even out the patient’s smile.
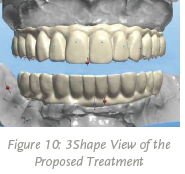
With improvements in materials and advancements in CAD/CAM technology (see Figure 10, above), full-arch prostheses can now be precisely milled from monolithic zirconia, offering aesthetics and functionality with the added benefit of long-term durability. Exhibiting exceptional fracture toughness and flexural strength, Ivoclar Vivadent’s Zenostar® zirconia has the ability to withstand the functional stresses that full-arch implant restorations are subject to over time.
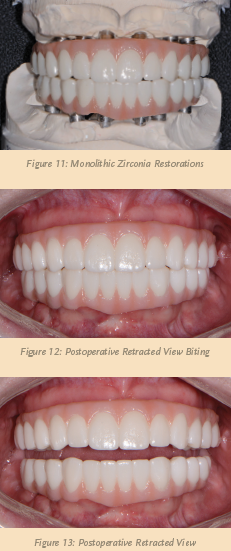
Unlike hybrid dentures, the entire body of the Zenostar® implant prosthesis (Arrowhead Dental Lab), including the gingival and tooth areas, is constructed from the same robust material. The strength and durability offered by Zenostar® is complemented by lifelike aesthetics and excellent translucency. The teeth of the prosthesis exhibit color very similar to natural dentition, and advanced staining techniques are used to establish gingival areas that blend well with the patient’s soft tissue.
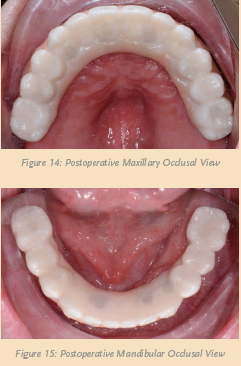
Within three weeks, the definitive maxillary and mandibular restorations were delivered from the dental lab (see Figure 11, above). Utilizing a right angle prosthetic driver, both provisionals were removed and the definitive restorations inserted (see Figures 12 and 13, above). Care was given to torque the retention screws according to the manufacturer’s recommendations. I took another panorex x-ray to verify that the restorations were completely seated. Once confirmed, a piece of Teflon tape was placed into each access opening, followed by composite material (see Figures 14 and 15, below).
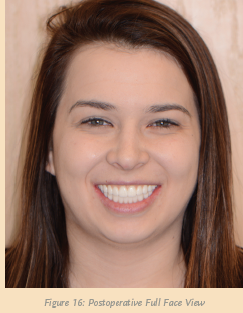
Finally, I checked and verified the occlusion with the T-Scan® (Tekscan) to make sure that all the proper points of contact were in their ideal positions, thereby ensuring the longevity of the reconstruction. The patient no longer experienced pain and was very pleased with her new, enhanced, “whiter” smile (see Figure 16, below).
Conclusion
Computer generated 3D virtual treatment plans allow dental providers and their teams to accurately place dental implants efficiently and effectively. With the variety of different software and associated surgical instrumentation available, dental implant diagnosis and treatment has become more simplified. This development has created an interdisciplinary environment in which better communication and precise execution lead to better patient care and outcomes.


